|
Microtonal Musical Robot
Research project on the development of new tools for musical expression at the University College Ghent |
|
<Heli>
an automated helicon Godfried-Willem RAES 2007-2008 |
|
Microtonal Musical Robot
Research project on the development of new tools for musical expression at the University College Ghent |
|
<Heli>
an automated helicon Godfried-Willem RAES 2007-2008 |
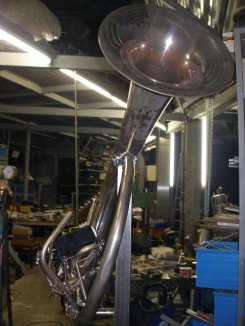
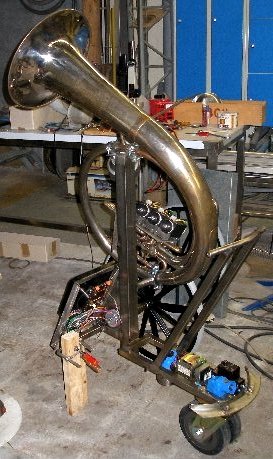
Robot: <Heli>
The Helicon which formed the starting point for this robot is an old marching
band instrument we bought at the local flea market back in 1988. It was full
of bumps and needed a profound repair session. However we were dreaming of turning
it one day into a robot... Much later, in 2007 and again on the local flea market
we got attracted by a very nice looking small single-cilinder compressor, probably
designed for inflating tires or spraying paint. It was belt driven by a small
AC collector motor. We immediately thought of using it for our automated helicon
and thus, in that direction our first series of experiments were conducted.
 So, at
first the experiment was not an attempt to automate the existing instrument
realistically, although it did in fact make use of the old helicon. At first
we aimed at an automated instrument that could produce machine- and motor like
sounds with an extremely low fundamental frequency range (1Hz to ca 30Hz). In
this sense it came close to one of the instrumental categories described by
the Futurist composer Luigi Russolo. The sonic results were actually quite impressive
and could be described as musically modulated industrial noise. So far so good,
but as soon as we discovered that the helicon functioned in fact only as a vaguely
tuned resonator we got frustrated in our pride as robot designer. As a matter
of fact, without the helicon, but fitted with a simple exponential horn, this
compressor mechanism actually sounded a lot better! Moreover, the mechanism
was incapable of producing discrete pitches without connecting them with an
awful portamento. Staccato playing and precise rhythm where virtually impossible
because of the sluggish behavior of the servo motor if it came to sudden speed
changes. Thus we dropped the design for <Heli> for quite some time and
left it sleeping in our workshop.
So, at
first the experiment was not an attempt to automate the existing instrument
realistically, although it did in fact make use of the old helicon. At first
we aimed at an automated instrument that could produce machine- and motor like
sounds with an extremely low fundamental frequency range (1Hz to ca 30Hz). In
this sense it came close to one of the instrumental categories described by
the Futurist composer Luigi Russolo. The sonic results were actually quite impressive
and could be described as musically modulated industrial noise. So far so good,
but as soon as we discovered that the helicon functioned in fact only as a vaguely
tuned resonator we got frustrated in our pride as robot designer. As a matter
of fact, without the helicon, but fitted with a simple exponential horn, this
compressor mechanism actually sounded a lot better! Moreover, the mechanism
was incapable of producing discrete pitches without connecting them with an
awful portamento. Staccato playing and precise rhythm where virtually impossible
because of the sluggish behavior of the servo motor if it came to sudden speed
changes. Thus we dropped the design for <Heli> for quite some time and
left it sleeping in our workshop.
In 2008 we were charged with a research project on the development of new tools
for musical expression supported by the Ghent University Association. The research
we conducted within this framework into our oboe playing robot <Ob>, immediately
made us take up the helicon project again. Effectively it came out that the
acoustic impedance convertor we had designed for the oboe, could also be applied
to this project. So we turned on the lathe in our workshop and worked out a
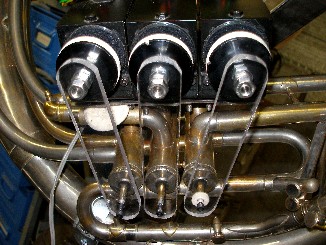
suitable convertor made of brass to couple a heavy duty compression driver,
rated 100 W with an outlet diameter of 18 mm to the bore and mouthpiece of the
helicon. Driven with a pure and symmetric triangular wave, the sound result
was immediately quite amazing. The smaller the orifice in the mouthpiece, the
more realistic the sound became and the better resonance in the instrument was
defined. However, sound volume decreases with decreasing orifices and thus we
found an orifice no larger than 4 mm an optimum value.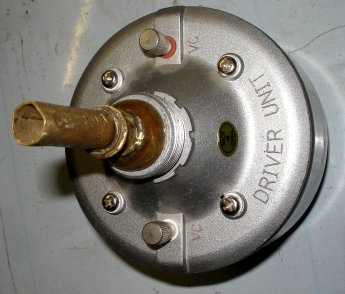
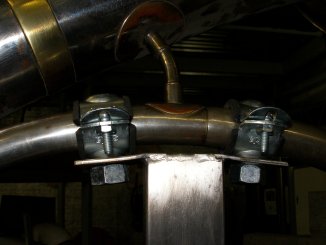
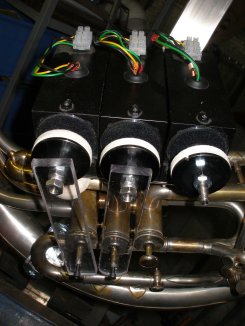
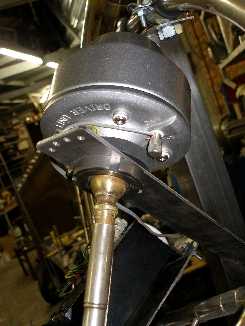
The Helicon valves are used in this instrument to tune the fundamental frequency of the instrument. They are driven by bi-directional solenoids in a design very similar to the one applied in <So>, our automated sousaphone. Instead of mounting the solenoids in line with the valves, here we mounted then in parallel with the valves. The action of the solenoids is transferred to the valves with 8 mm thick strips of polycarbonate. This was mainly done to save space. The internal springs inside the valves now become superfluous and may be removed. The implementation of fingering lookup tables was also taken over from the <So> design.
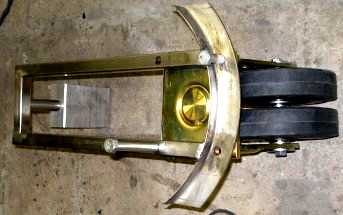
Just like all our robots, this one again was mounted on wheels such as to make it easy to transport and handle on stage. For this design we choose two 590 mm diameter spoke wheels with massive polyurethane tires and a couple of heavy 200 mm wheels on the back. The entire mechanical construction was welded from stainless steel using the manual TIG process.
Power supply voltages and currents:
Midi Mapping and implementation:
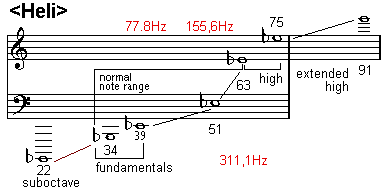
Midi channel : 8 (counting 0-15).
Midi note range: 22-91. Note on, velocity is implemented and has a wide control
range. The external input may be mapped onto the note range 101-108 (way above
the normal ambitus and the extended range) This implements vocal/instrumental
multiphonic playing.
Note Off commands are required, but can be dropped for pure legato playing.
A note-off releases the valves and unpowers them. It starts the fast decay section
of the mouth driver.
The two lights are mapped on notes as follows:
Controller 1 is used to control the amount of wind noise
in the sound (not yet implemented)
Controller 7 is used to modify the sound color. (set to 64 as a default). Can be used as a volume controller in the range 6-12, but generally it is better to use controller 17 to control the overall volume.
Controller 8 is used to control the sound level and/or envelope of the externally injected signal. (XLR balanced line input). It can be used for low speed amplitude modulation of the external drive input.
Controller 13: changes the lookup table for the valve-pitch correspondence. The default is 0 and conforms to an empirical mapping of valve combinations for optimal resonant sound. Value 1 selects the theoretical valve combinations calculated after simplified acoustic theory, values 2 and 3 select user programmable (sysex) lookup tables. Higher values can be used to send just any valve combination the user wants te see used for any note. The table below gives all details:
Ctrl 13 Value -1/2t -1t -2t remarks 0 default empirical [detailed mapping] 1 acoustic [detailed mapping] 2 user table 1 (sysex programmable) 3 user table 2 (sysex programmable) 4 off off off 4-7 valid 12 on off off 12-15 valid 20 off on off 20-23 valid 28 on on off 28-31 valid 36 off off on 36-39 valid 44 on off on 44-47 valid 52 off on on 53-56 valid 60 on on on 60-63 valid other invalid
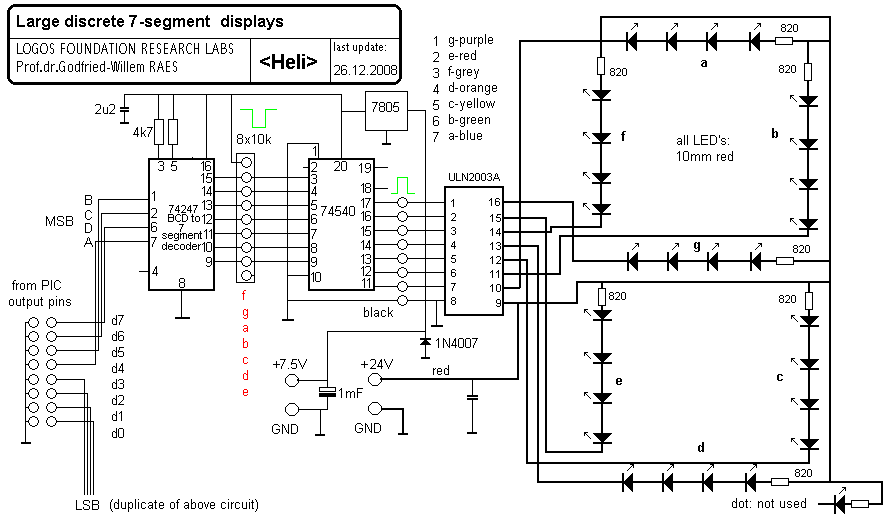
Controller 14 sets the functionality of the display (values 0-3): With value 0, the display always shows the midi note the helicon is playing. With value 1, the displays show the value sent with controller 15 (value range 0-99), with value 2, controllers 26 and 27 can be used to display numbers and signs (0-15) to each display independently. With value 3, the displays will we completely off. Other values for this controller are disregarded. The default setting for controller 14 on startup is 0.
Controller 15: if controller 14 is set to value 1, controller 15 allows you to send a numeric value 0-99 to the displays. Note that it is up to the user to limit the number to 99 (use count MOD 100, in your code). For higher values, strange signs do appear on the displays...
Controller 17: Attack level. For sfz effects, use high values for this controller in combination with low values for the note-velocities.
Controller 18: Attack duration. Default value: 125.
Controller 19: Release duration. Very high values (> 120) of this controller will lead to pure legato playing. For short staccato notes, set this controller to 64.
The relation between all the envelope related controllers described above is
clarified in the time plot diagram below: 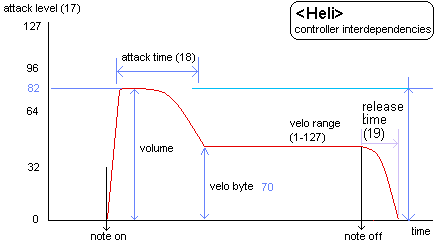
Controller 26: if controller 14 is set to value 2, controller 26 allows you to send a nibble to the msb of the display. For values larger than 9, the display shows 'strange' signs. It is up to the user to limit the range. For value 15 (Hexadecimal F) the display goes blank.
Controller 27: if controller 14 is set to value 2, controller 27 allows you to send a nibble to the lsb of the display. For values larger than 9, the display shows 'strange' signs. It is up to the user to limit the range. For value 15 (Hexadecimal F) the display goes blank.
Controller 66: required to switch the robot on or off.
Controller 123 switches all notes off, blanks the display and releases the solenoids.
Program change: implemented. Program changes are used to load different lookup tables for the fingerings of the valves. The default setting is 0.
Pitch bend: implemented with a range of a semitone (a quartertone up or down). The coding for a fragment of a quartertone scale is as follows:
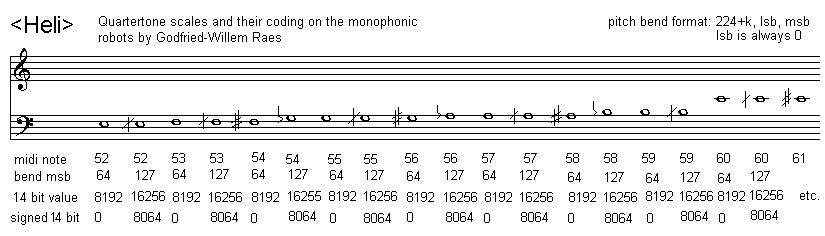 Most good sequencer
software (such as Cakewalk or Sonar) use the signed 14 bit format. Note that
one unit of the msb corresponds exactly to a 0.78 cent interval. To convert
fractional midi to the msb only pitchbend to apply, follow following procedure:
if the fractional part is <= 0.5 then msb= 63 + (FRAC(note) * 128), if the
fractional part is larger than 0.5, we should switch on the note + 1 and lower
the pitch with msb= (1-FRAC(note)) * 128.
Most good sequencer
software (such as Cakewalk or Sonar) use the signed 14 bit format. Note that
one unit of the msb corresponds exactly to a 0.78 cent interval. To convert
fractional midi to the msb only pitchbend to apply, follow following procedure:
if the fractional part is <= 0.5 then msb= 63 + (FRAC(note) * 128), if the
fractional part is larger than 0.5, we should switch on the note + 1 and lower
the pitch with msb= (1-FRAC(note)) * 128.
Technical specifications:
Design and construction: dr.Godfried-Willem Raes
Collaborators on the construction of this robot:
Music composed for <Heli>:
Pictures taken during the construction:


| Back to composers guide to the M&M robot orchestra. | Back to Main Logos page:index.html | To Godfried-Willem Raes personal homepage... | To Instrument catalogue |  |
Robot: <Heli>
De overgrote meerderheid van de muzikale robots die we ontwikkelden voor 2007, waren elk voor zich pogingen om bestaande akoestische instrumenten zo getrouw mogelijk te automatiseren in zoveel mogelijk aspekten van hun bespeling. Het <Heli> projekt week aanvankelijk van dit opzet in hoge mate af. Hier was het helemaal niet direkt onze bedoeling een automatisch helicon te bouwen (immers, een automatische Sousafoon -<So>- hadden we reeds met redelijk sukses voltooid, waardoor een automatisch helicon niet direkt een nieuwe verwezenlijking leek te zijn door het toch wel erg gelijkende karakter van beide instrumenten).Voor het klankopwekkingsmechanisme gingen we hier dan ook uit van een kleine cilinderkompressor aangedreven door een zware (en peperdure...) servomotor. Hierdoor werkt het instrument vooral goed in de extreem lage frekwentiegebieden (1Hz-30Hz). Dynamische aansturing van de opgewekte geluiden werd gerealiseerd via een regelventiel op de aanzuigopening van de kompressor. Het voortgebrachte geluid was weliswaar imposant, maar had toch wat teveel weg van gemuzikaliseerd industrieel lawaai. Het helicon deed in dit opzet in eerste plaats dienst als vaag afstembare resonator en de preciese implementatie van de ventielen deed er eigenlijk niet zoveel toe. Het spelen van diskrete intervallen was bovendien problematisch omdat we nooit snel genoeg het toerental van de servo geregeld konden krijgen, met als gevolg dat alle 'noten' met een zwaar portamento werden gespeeld. Staccato en zuiver ritmisch gebruik van het instrument konden we al helemaal vergeten. We vonden dat na enige tijd toch wel onbevredigend, omdat in menig opzicht we eenzelfde resultaat ook hadden kunnen bereiken zonder helicon... Kortom, onze fierheid was gefrustreerd en <Heli> ruste een hele tijd werkloos en onafgewerkt in ons atelier. Het bouwprojekt leek opgeborgen, zoniet afgevoerd.
In 2008 werden we voltijds belast met een onderzoeksopdracht aan
de Associatie Universiteit Gent (departement muziek en drama) rond de ontwikkeling
van expressiemiddelen. De experimenten die we in dat kader uitvoerden naar aanleiding
van bouw en ontwerp van onze hobo-robot in 2008, brachten ons op het idee de
daar beproefde metode ook op ons helicon toe te passen. Daartoe draaiden we
op de draaibank een akoestische impedantietransformator aangepast aan de mensuur
van enerzijds een 100W kompressiedriver (18mm uitgang) en anderzijds het mondstuk
van het originele helicon. Hierbij bleek de klank beter te worden (lees: de
resonantie in het helicon scherper en gedefinieerder) naarmate het gaatje in
de kuip van het mondstuk kleiner werd. Natuurlijk gaat het geluidsvolume evenredig
achteruit en moest er dus een optimale waarde worden gevonden. Vier millimeter
bleek geschikt, meer mocht het echt niet zijn. Voor de aansturing van de driver
experimenteerden we middels onze funktiegeneratoren met allerhande golfvormen
voor de excitatie en het resultaat was verrassend simpel: een eenvoudig symmetrisch
driehoekssignaal bleek het beste en meest realistische geluid op te leveren.
Vandaar de stap om voor de klankgeneratie ook hier weer een dsPIC, type 30F3010 toe te passen. Fundamenteel hetzelfde ontwerp wat we ook voor <Aeio> ontwikkelden. De keerzijde van de medaille is hier dat het nu niet mogelijk is extreem lage noten met volle sonoriteit gespeeld te krijgen zoals dat bvb. bij <So> wel het geval was. Dit verlies wordt echter in ruime mate gekompenseerd door het veel groter bereik in de hoogte.
De ambitus van deze automaat overtreft in de hoogte veruit dat wat zelfs door de allerbeste spelers ooit zou kunnen worden voortgebracht. De keerzijde daarvan is dat die extreem hoge tessituur niet 'realistisch' klinkt aangezien ze niet aan enige bekende realiteit beantwoord. Mikrotonale muziek is op deze automaat perfekt te spelen, aangezien de toonhoogte van elke noot afzonderlijk over een bereik van 100 cents kan worden gevarieerd. Niet alleen perfekt voor kwarttoonsmuziek, maar eigenlijk voor elke denkbare stemming.
De ventielen werden geautomatiseerd met bidirektionele elektromagneten,
helemaal naar plan en opzet zoals toegepast bij <So>. In dit geval echter
monteerden we de elektromagneten bovenop de ventielen en dus niet in lijn met
de bewegingsas zoals bij So. We deden dit vooral om plaats te sparen en de uiteindelijke
breedte van het instrument binnen de perken te houden. De overbrenging van de
beweging van de ankers van de elektromagneten naar de ventielen voerden we uit
met polykarbonaat strips. Dit is een elastisch en heel erg sterk materiaal.
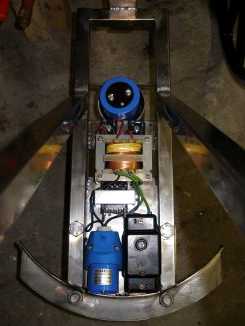
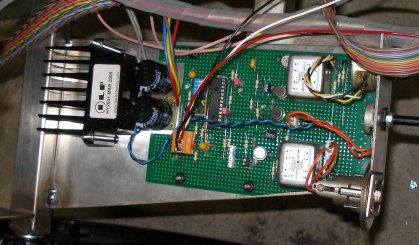
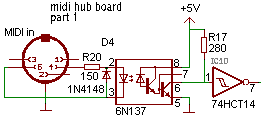
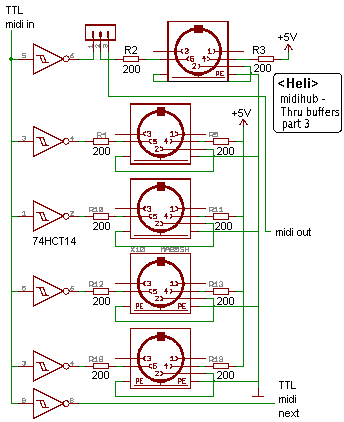
Voor de besturing
werd ook hier een PIC processor toegepast. Het gebruikte board is ook hier een
nieuwe toepassing van een eerder ontwikkeld board met de Microchip 18F2525 processor,
met name het Midihub board. De zes vrije mosfet uitgangen volstaan voor het
aansturen van de bidirektionele elektromagneten.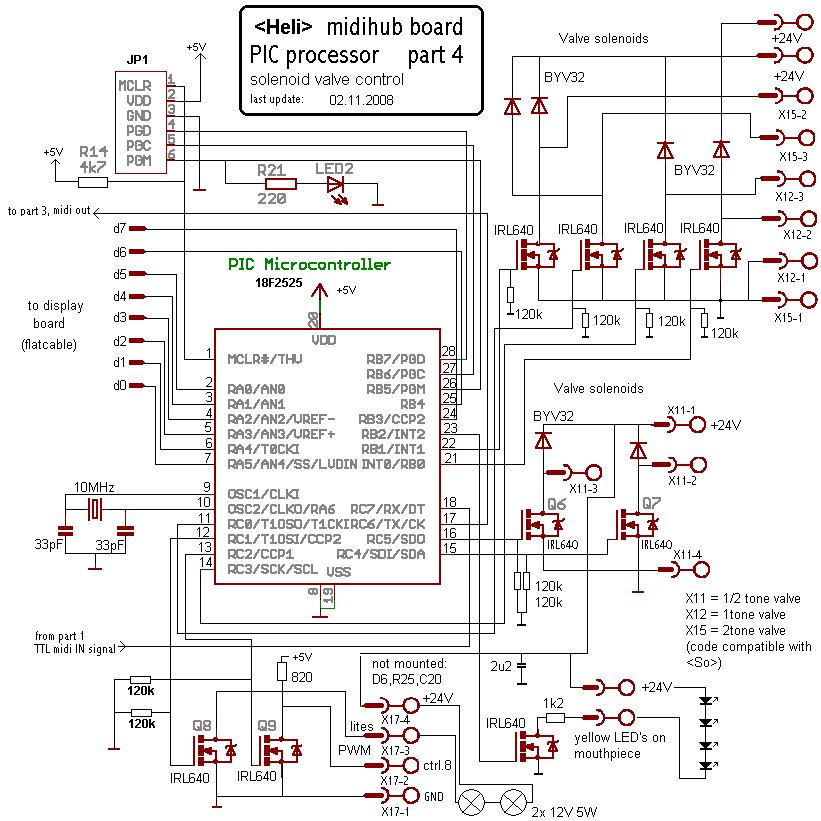 De op dit board beschikbare PWM uitgangen werden ingezet voor de besturing van
belichtingseffekten. De acht resterende vrije uitgangen gebruikten we voor het
aansturen van het display: twee 7-segment digits opgebouwd uit diskrete 10 mm
LED's. Net zoals bij <So> toont dit display als default de klinkende midi
noot, maar het display kan ook voor andere funkties geprogrammeerd worden. Wie
de steeds maar wisselende getallen storend vindt, kan de displays trouwens geheel
buiten werking stellen.
De op dit board beschikbare PWM uitgangen werden ingezet voor de besturing van
belichtingseffekten. De acht resterende vrije uitgangen gebruikten we voor het
aansturen van het display: twee 7-segment digits opgebouwd uit diskrete 10 mm
LED's. Net zoals bij <So> toont dit display als default de klinkende midi
noot, maar het display kan ook voor andere funkties geprogrammeerd worden. Wie
de steeds maar wisselende getallen storend vindt, kan de displays trouwens geheel
buiten werking stellen.
Zoals voor zowat alle robots die we tot hiertoe ontwierpen en bouwden, is ook voor dit exemplaar een speciaal wielstel gebouwd. Dit ter vereenvoudiging van het transport enerzijds en van de handelbaarheid op de podia anderzijds. In dit geval pasten we grote kunststof spaakwielen toe met een diameter van 590mm aan de voorzijde, terwijl de achterzijde loopt op een zwaar stalen dubbel zwenkwiel van 200mm voorzien van polyurethaan banden. Alle wielen zijn voorzien van degelijke kogellagers.
Construction Diary:
Toroidal
transformer mounted using Parabond Hitack. Wiring of the complete generator
subsystem finished.Wiring of the
solenoids to the midihub board. Mounting and wiring of the yellow LED's on
the driver. 24V power supply wiring finalized. Capacitor fixed in place with
Parabond Hitack. Apparently we made a hardware bug in the design of the display
driver board: we forgot a power supply connector...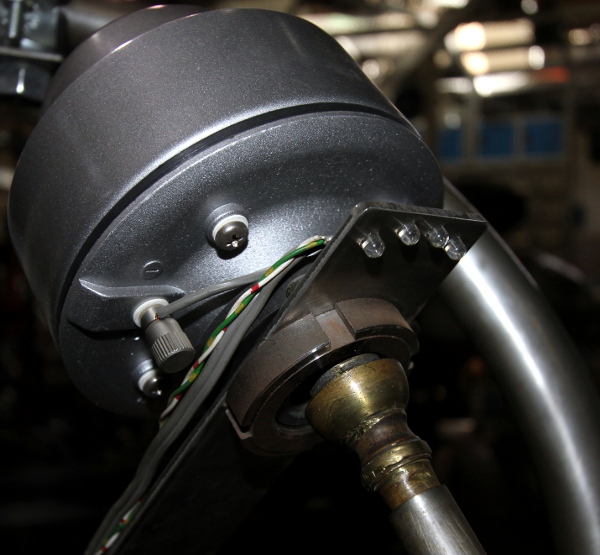
| (Terug) naar logos-projekten: | Terug naar Logos' index-pagina: | Naar Godfried-Willem Raes personal homepage... | Naar katalogus instrumenten | |
Last update: 2024-04-22 by Godfried-Willem Raes
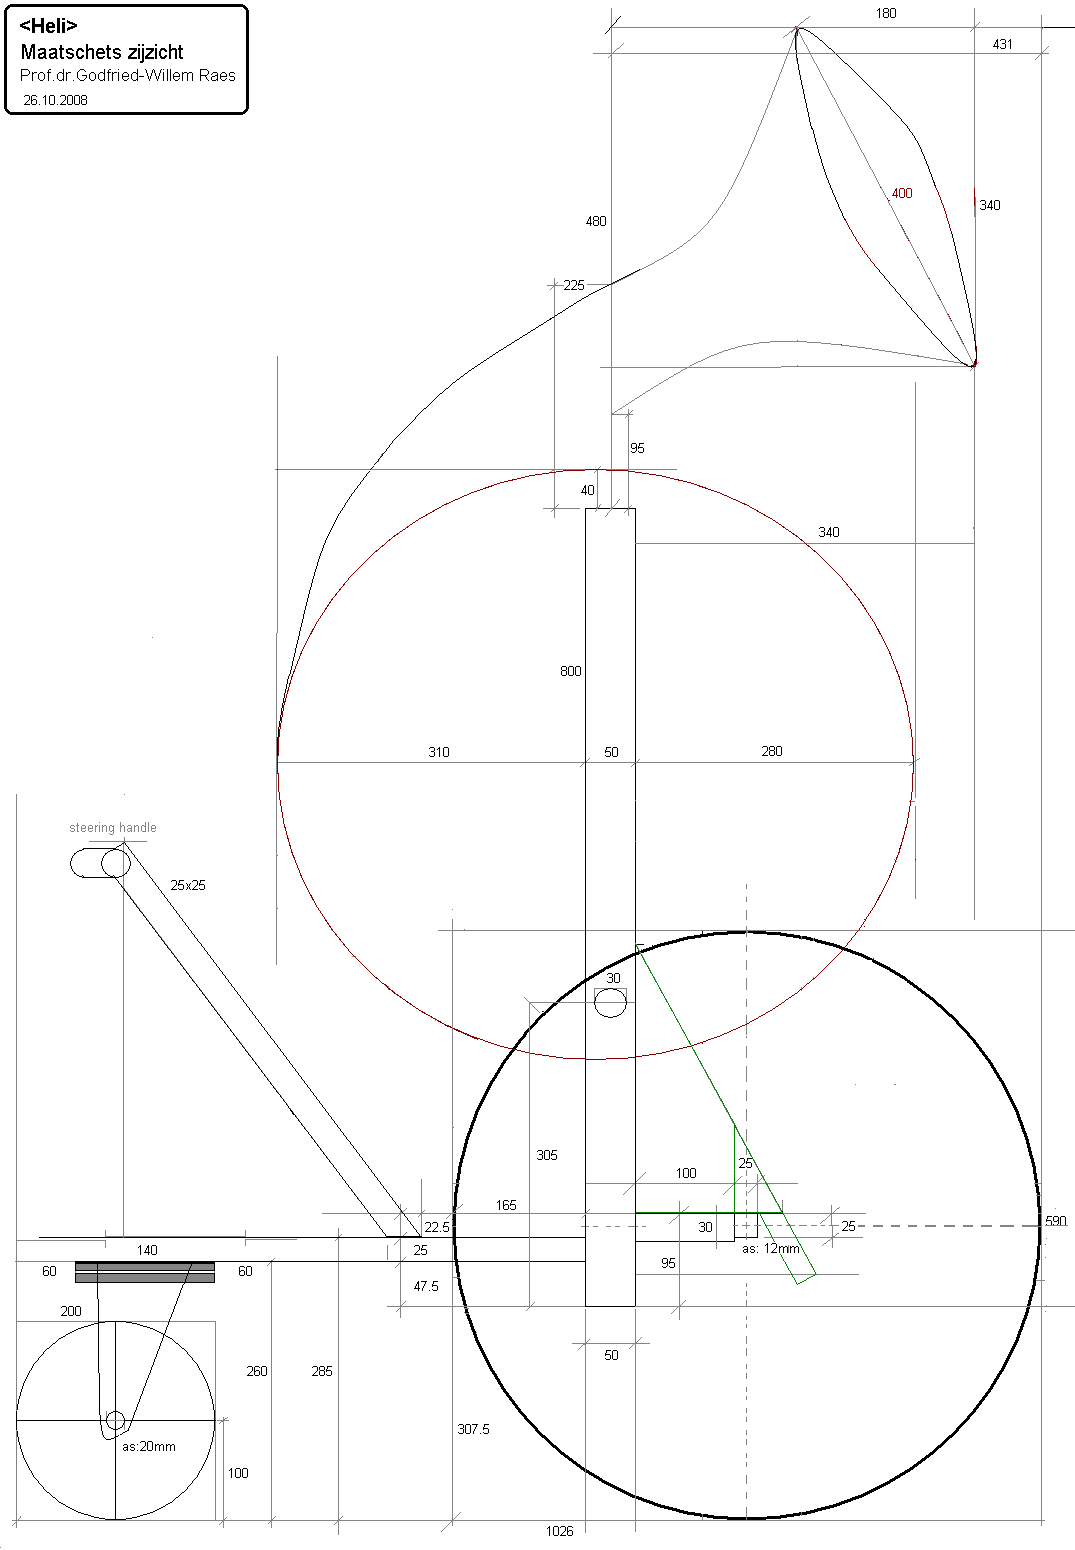
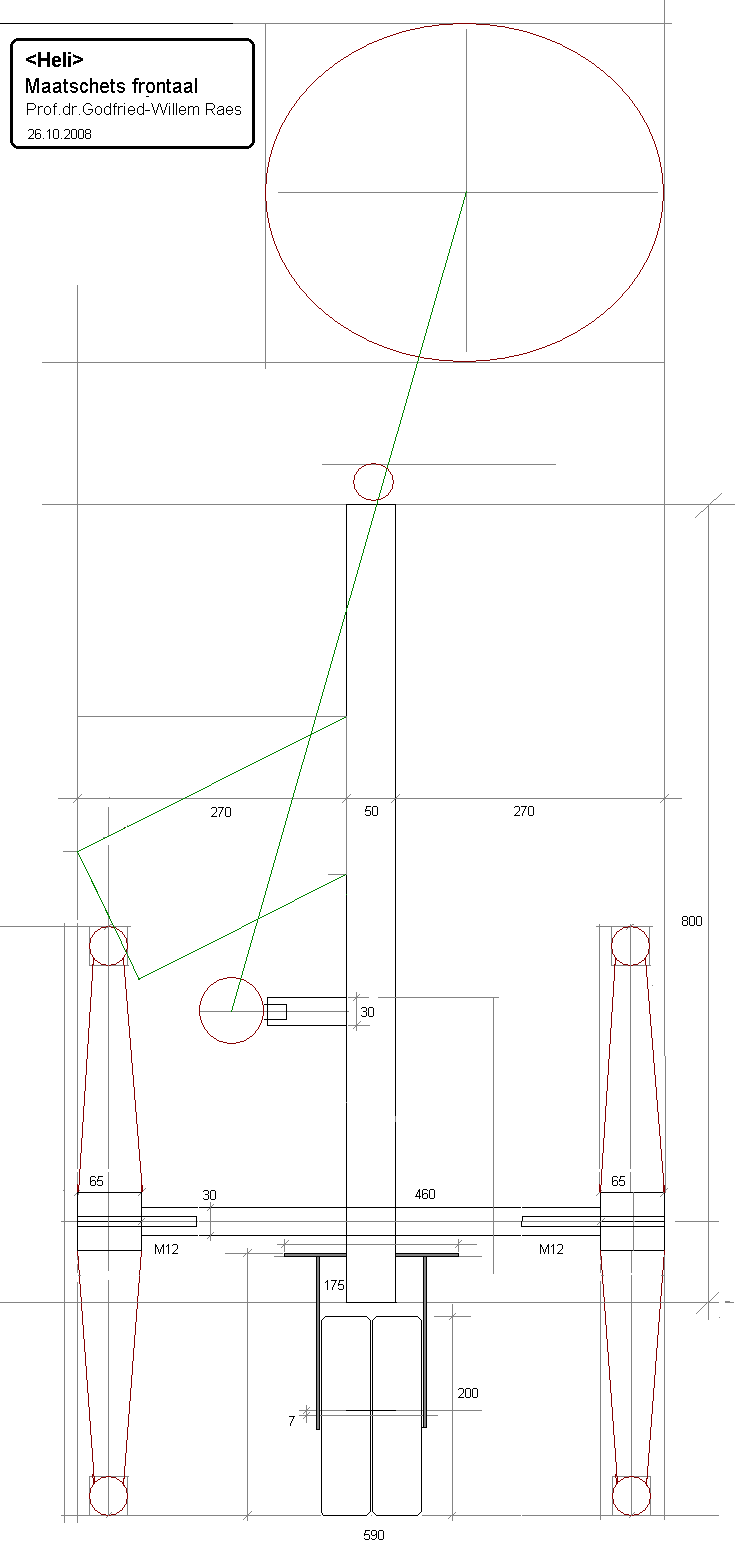
Technical drawings and data sheets:
Mechanical parts & construction:

Midi-hub board:


Driver generator:

Power meter: very large size US made analogue moving coil A-meter. Full scale sensitivity: 1mA. Internal resistance 162 Ohm. We recycled this part from an old Craydon garage car tuning machine.
Display circuit:
Power supply:

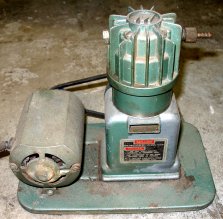
Compressor used in the first experimental version: MILLER, 220-240V AC/DC .75A,
165W (original collector motor) K.J.Miller Corporation, Brookfield, Illinois,
USA.In
2023, this compressor found a place in our <Rumo> robot as in <Heli>
it was found capable of only sounding the lowest octave.
Driver unit used in the second version: Model PADU 100, power rating 100W,
impedance 16 Ohms. (Made in China)
We have measured this component carefully and found the impedances in function
of applied frequency as follows:11.4 Ohms @ 100Hz, 23.68 Ohms @ 1kHz, 26.7 Ohms
@ 10kHz and 45 Ohms @ 25kHz. The acoustic load does influence the measured impedance
at 1kHz over a 1:2 range: with the mouth completely closed it measures 32.8
Ohms and with the mouth completely opened but without any resonator, 15.35 Ohms.
This phenomenon does not occur for the very low neither for the very high frequencies.
The measurements were performed with our Hameg LCR meter, model HM8018. The
frequency response is 100Hz to 10kHz. The thread for mounting is a weird 1 3/8"-18
TPI.
Wheels:
Solenoid valves: August Laukhuff, bidirectional, 24V - 24 VA (24 Ohms per winding, 1 A nominal at 100% duty cycle).
Lights:
Helicon: Made by Melchior De Vries in Lier, Flanders. Eb instrument, tuned to 440Hz. Three valves. (-1/2, -1, -2), Lowest note (without valves) 39. With all valves pushed down: 32.
References:
