|
<Per>
|
|
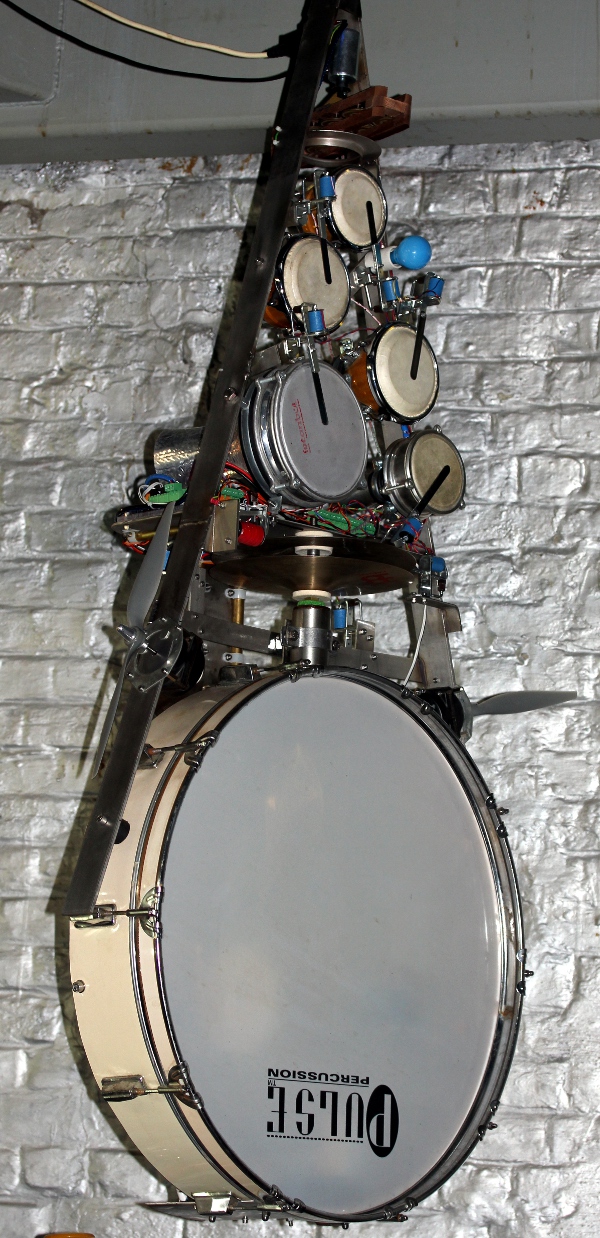
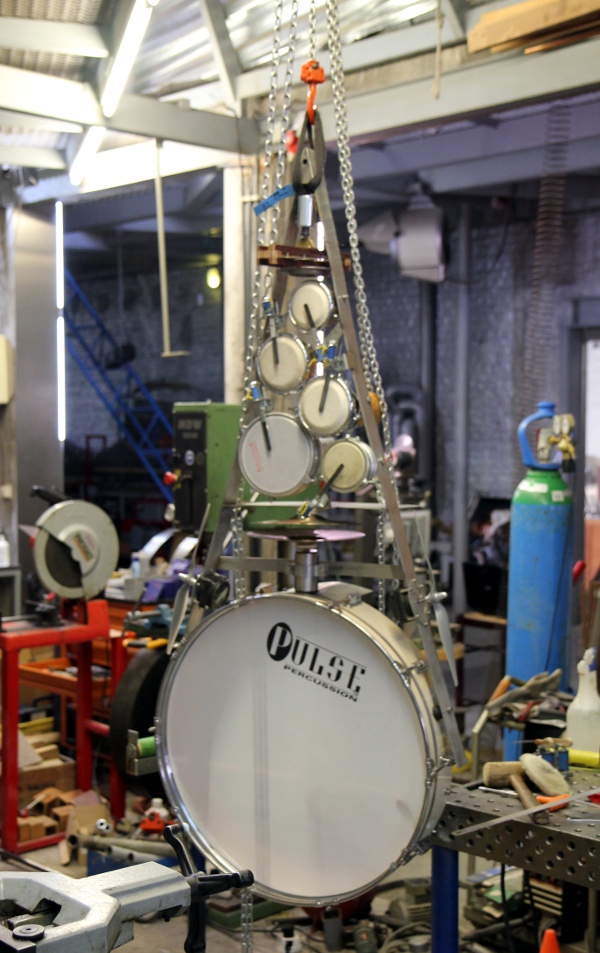
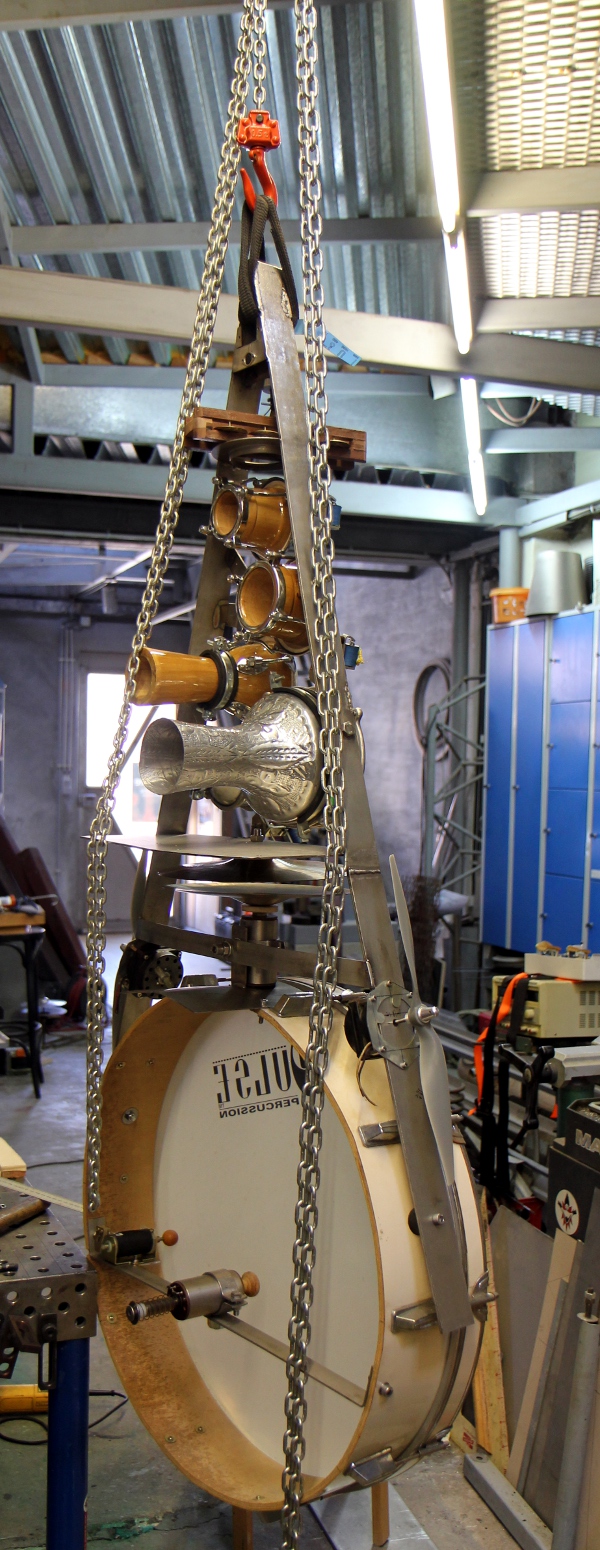
an automated suspended drum kit Godfried-Willem RAES 2018 |
|
<Per>
|
|
an automated suspended drum kit Godfried-Willem RAES 2018 |
Robot: <Per>
In January 2018 we got a request from the Speelklok museum in Utrecht to make
some of our robots available for a long running exhibition on musical robots.
The robots they wanted to borrow were <Aeio>, <Bello>, <Bug>,
<Pos> and... <Simba>. The loan came in as a perfect fit for the
50th anniversary of Logos. However, this placed us for a serious problem, <Simba>
being used in an awful lot of orchestrations for our robot orchestra. Thus we
decided to isolate the most frequently used components found in <Simba>,
the hi-hat and the bell-rattle (tambourine) , and started designed a new robot
that could replace these components and add some extra features as well. Thus
<Per> was designed such that it could for the most part replace both <Simba>
and <Troms>, a minimal drum kit as it were. As we are running out of space
at Logos - at the time of this writing, the robot orchestra consists already
of 72 musical robots - we decided to make it a robot to be suspended from the
ceiling. Hence, it should not become too heavy. The idea of a flying drum kit
also inspired us to develop a special Namuda production around it, to be premiered
at the occasion of the festivities for the 50th anniversary of the Logos Foundation
in our homebase in Ghent..
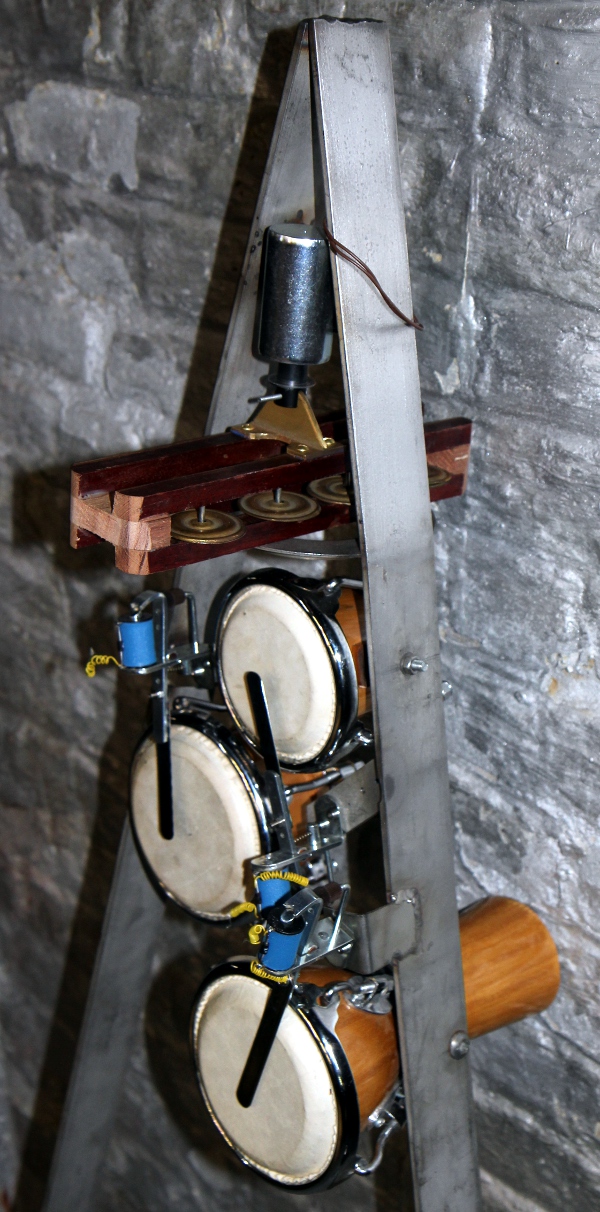
Here are some selected components:
For the tambourine we used 16 brass shell bells from an old orchestral tambourine
dating from the beginning of the 20th century. In fact, the same shells as used
for the <simba> robot. The design, although entirely
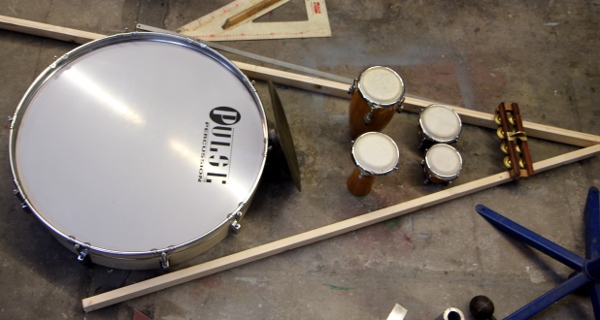
new, follows the lines of the original instrument. 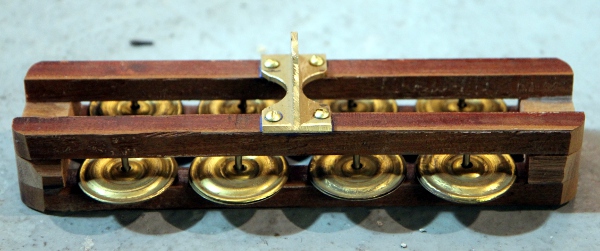 Also we found back a small set of four Latin Percussion drums we once got as
a present from a girlfriend:
Also we found back a small set of four Latin Percussion drums we once got as
a present from a girlfriend: 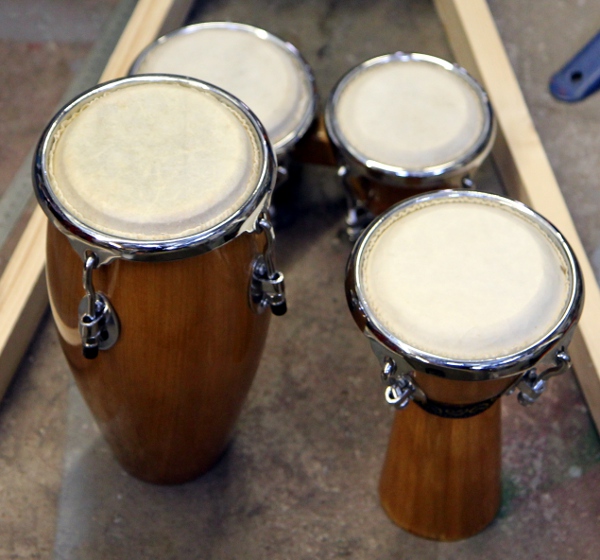 As these are miniatures, although very well made, they produce very high pitched
drum sounds. The kit consists of a small conga, a darbukah and a pair of bongos.
Designing a good sounding beater mechanism for these tiny instruments was not
a trivial matter. The beater mechanisms we used hitherto didn't work very well
and certainly couldn't compete with what human hands and fingers can produce.
It's also worth to note that these drums use pretty thick natural skins and
thus require quite some striking force. The best results we got after long experimenting
sessions, was using flat blade springs as beaters. These springs we made from
old metal saw blades. As the blade springs have to hit the drum membrane in
a perfectly flat way, this idea can only be applied to drums not having a rim
over their circumference. So it would not be applicable in a robot such as <Troms>.
As these are miniatures, although very well made, they produce very high pitched
drum sounds. The kit consists of a small conga, a darbukah and a pair of bongos.
Designing a good sounding beater mechanism for these tiny instruments was not
a trivial matter. The beater mechanisms we used hitherto didn't work very well
and certainly couldn't compete with what human hands and fingers can produce.
It's also worth to note that these drums use pretty thick natural skins and
thus require quite some striking force. The best results we got after long experimenting
sessions, was using flat blade springs as beaters. These springs we made from
old metal saw blades. As the blade springs have to hit the drum membrane in
a perfectly flat way, this idea can only be applied to drums not having a rim
over their circumference. So it would not be applicable in a robot such as <Troms>.
The bass drum used here is in fact the other half of the bass drum we used
for the <Troms> robot : 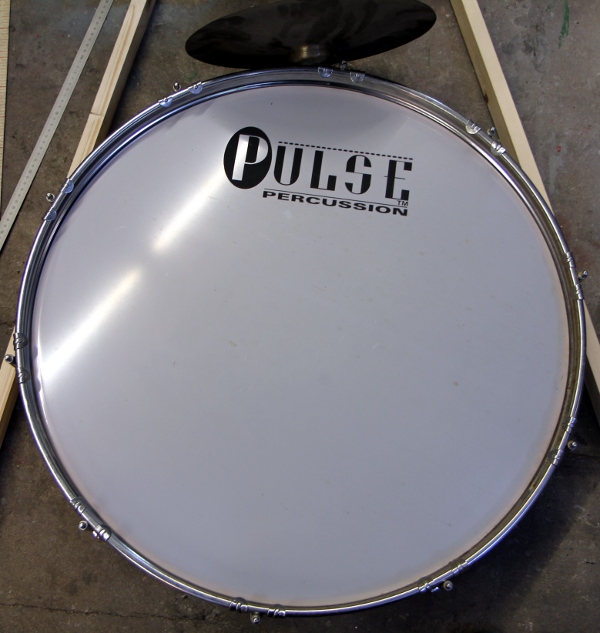 Inside the bass drum we mounted a pedal beater using a hefty open solenoid with
flying anchor, two twin beaters with piano hammers, a single rimshot beater
as well as a large felt-covered damper driven by a linear push solenoid. A small
cymbal, with a single beater, was mounted as well. A single crotale tuned to
high B (midi note 95), made by Avedis Zyldian, was added as well. The cymbals
were more of a problem as we did not have a pair of decent cymbals with equal
diameters in stock... We bought a new set of Turkish cymbals. For the movement
of these cymbals on the hi-hat mechanism, we found a heavy duty solenoid type
- presumably made by Siemens - , but the anchor was missing. So we made a new
anchor from very thick polished steel tube, in fact a recycled part from an
old photocopier.
Inside the bass drum we mounted a pedal beater using a hefty open solenoid with
flying anchor, two twin beaters with piano hammers, a single rimshot beater
as well as a large felt-covered damper driven by a linear push solenoid. A small
cymbal, with a single beater, was mounted as well. A single crotale tuned to
high B (midi note 95), made by Avedis Zyldian, was added as well. The cymbals
were more of a problem as we did not have a pair of decent cymbals with equal
diameters in stock... We bought a new set of Turkish cymbals. For the movement
of these cymbals on the hi-hat mechanism, we found a heavy duty solenoid type
- presumably made by Siemens - , but the anchor was missing. So we made a new
anchor from very thick polished steel tube, in fact a recycled part from an
old photocopier. 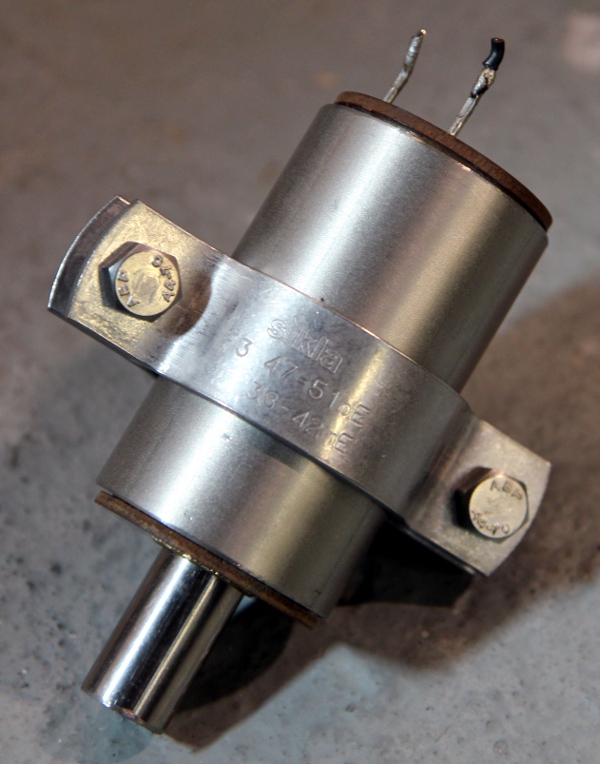 The
hi-hat assembly using these solenoids came out to look like this:
The
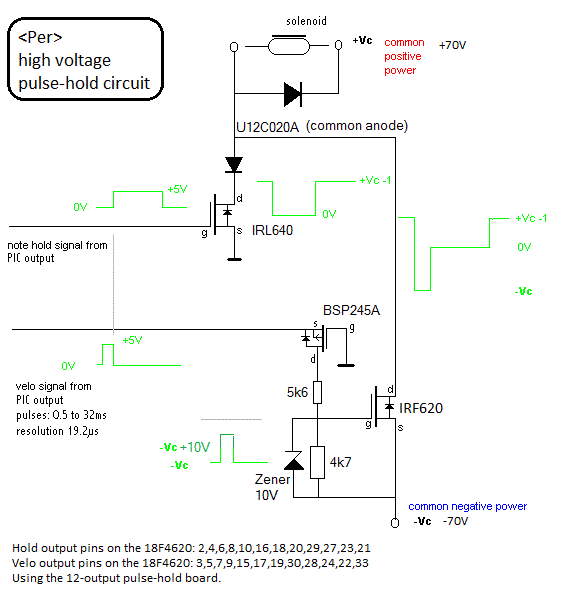
hi-hat assembly using these solenoids came out to look like this: 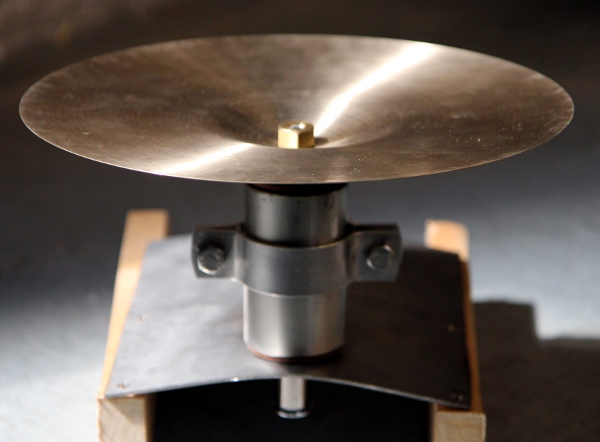 To
operate well, these solenoids require pretty high voltages. However, at 100%
duty cycle the voltage must be limited to 40 V, as we found out by measurement
(temperature rise over a long time in function of applied voltage). Thus we
required a microprocessor controlled high voltage power supply. To keep things
as simple and reliable as possible, we first tried to use a zero cross optical
relay -internally using a triac - driving a rectifier and a quite hefty electrolytic
capacitor.
To
operate well, these solenoids require pretty high voltages. However, at 100%
duty cycle the voltage must be limited to 40 V, as we found out by measurement
(temperature rise over a long time in function of applied voltage). Thus we
required a microprocessor controlled high voltage power supply. To keep things
as simple and reliable as possible, we first tried to use a zero cross optical
relay -internally using a triac - driving a rectifier and a quite hefty electrolytic
capacitor.
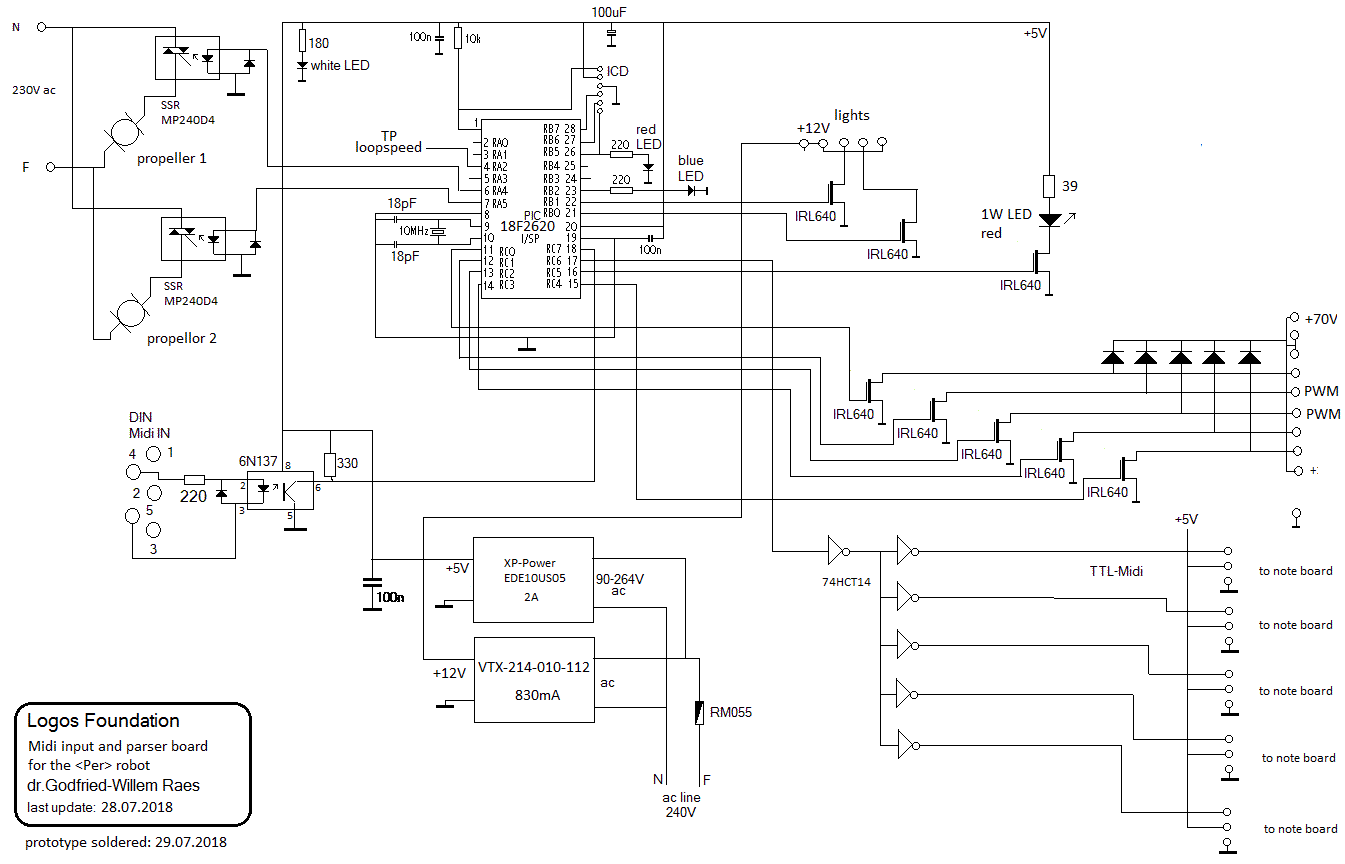
This is the principle, drawn as a circuit diagram: 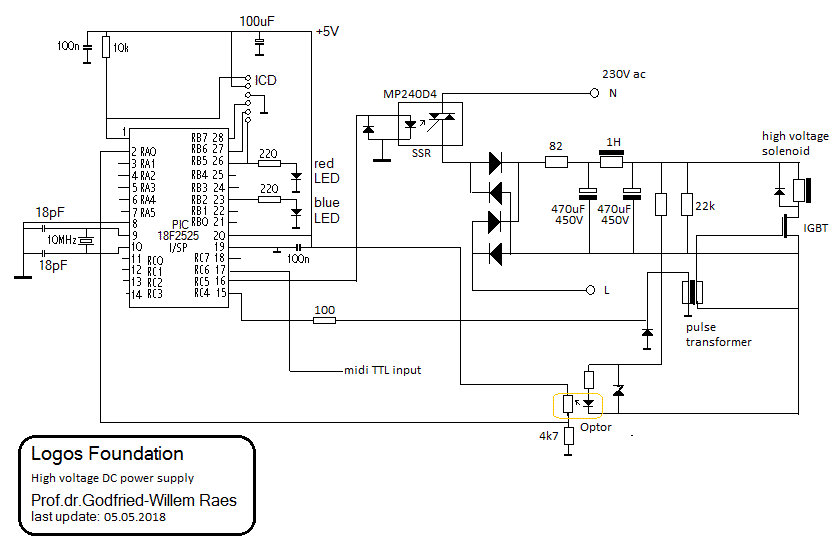 We
revisited an old and proven but quite primitive circuit principle:
We
revisited an old and proven but quite primitive circuit principle: 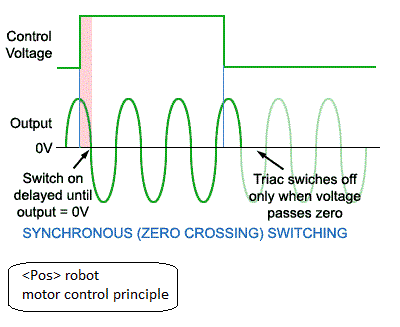 This is pretty easy to implement on a PIC controller, as long as the control
pulses are longer than a full period of the mains frequency, 20 ms. Due to the
long RC time realized with the large capacitors, we can go with very slow PWM.
The solid state AC relay we used is MP240D4, as it's a zero-cross relay specified
for 4 A at 280 Vac. The feedback-loop for voltage regulation makes use op an
Optor, a resistive optocoupler. Instead of the pulse transformer driving the
IGBT, an optocoupler can be used as well, but this requires a separated power
supply, unless an esoteric high voltage optocoupler is used. Note that there
always must be a load in this circuit, as otherwise output voltage will always
be the peak voltage of the input. In practice however, this approach was abandoned
because the loads -mostly short pulses- were way too irregular to make the voltage
regulation work reliably. The result was clearly varying and unreliable velocity
pulses on the solenoids. Thus we decided to go back to a very simple unregulated
power supply providing +71 V and -71 V at some 250 VA, using a toroidal 2 x
50 V transformer, a rectifier bridge and two hefty capacitors.
This is pretty easy to implement on a PIC controller, as long as the control
pulses are longer than a full period of the mains frequency, 20 ms. Due to the
long RC time realized with the large capacitors, we can go with very slow PWM.
The solid state AC relay we used is MP240D4, as it's a zero-cross relay specified
for 4 A at 280 Vac. The feedback-loop for voltage regulation makes use op an
Optor, a resistive optocoupler. Instead of the pulse transformer driving the
IGBT, an optocoupler can be used as well, but this requires a separated power
supply, unless an esoteric high voltage optocoupler is used. Note that there
always must be a load in this circuit, as otherwise output voltage will always
be the peak voltage of the input. In practice however, this approach was abandoned
because the loads -mostly short pulses- were way too irregular to make the voltage
regulation work reliably. The result was clearly varying and unreliable velocity
pulses on the solenoids. Thus we decided to go back to a very simple unregulated
power supply providing +71 V and -71 V at some 250 VA, using a toroidal 2 x
50 V transformer, a rectifier bridge and two hefty capacitors.
We invested quite a lot of research time on the beater mechanisms used in this robot. First of all we wanted to improve on the beaters as we made them for <Troms>. The problem with <Troms>, using Laukhuff pallet valves for the beaters, was that the dynamic range goes down with decreasing size of the drums. Here we wanted to get a much more sharp and penetrating sound. As said above, we found that flat blade springs perform better in this respect than striking mechanisms using a ball head. However for the bass drum, we went a very different way and here we used solenoids with a fully free anchor. These behave very different than standard push or pull solenoids. When activated, the anchor moves to the magnetic central position and moving it from there requires a force proportional to the distance of the movement, up to half of the length of the anchor. So the behavior is a bit spring-like. When activated with the anchor one fourth of the length out of center, the anchor moves through the coil with an overshoot and then returns back to the central position. It's exactly this overshoot we use here for striking the drum. A light spring is used to return the anchor to an out-of-center position after a stroke. Without such a spring, further strokes would be impossible as the anchor wound start from the central and forceless position. The big advantage of this mechanism is that it guarantees an elastic stroke, as the anchor with the attached beater is basically free during the collision with the membrane of the drum. It goes at a price however: repetition speed is limited by the large inertia of the anchor and also, power efficiency is quite low. Mostly for visual reasons, we wanted the drums in a vertical position although from a pure functional point of view, a horizontal position would yield much better results and has the advantage that a return spring would not be needed and that friction would be minimized.
The damper on the bass drum was implemented in a much more refined way, compared to our <Troms> robot. First of all, the pressure of the damper against the skin can be controlled with the velo byte accompanying note 21. Pressure can be further modulated using the keypressure command for note 21 whilst the damper is activated. It is very important to know that the damper can use an overvoltage to obtain extra large forces. However, this cannot be done for a long time as the solenoid will get very hot. If users want to use the damper for an extended on-time (100% duty cycle) , the maximum value for velo as well as keypressure is 86. When the keypressure command for note 21 is issued without a note-on command, no velocity pulse will be applied to the solenoid. Thus it is possible to use the damper as a very soft beater on the bass drum. The velocity pulse produced at the reception of a note-on command can be controlled with controller #21. The default value for this controller is 1.
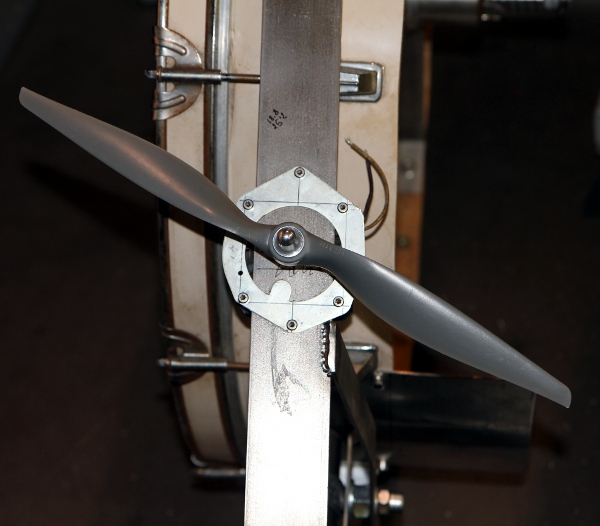
Calling this robot a 'flying' drum kit is a bit of an exaggeration. However, we did equip it with two motor driven propellers such that it is in fact capable of making gentle moves and swings when suspended on its hook. The motors are speed limited as we wanted to avoid serious accidents and injuries. The maximum speed is now ca. 1400 rpm whereas in order to develop substantial thrust, it ought to be at least some 8500 rpm. The propellers used are spare parts made for model aircraft's. The motors stem from an old professional Truvox reel-to-reel tape recorder.
The firmware for the two PIC microprocessors used was written in Proton Basic.
| Firmware for the midihub and power board | per_hub.bas | per_hub.hex |
| Firmware for the pulse-hold board | per_beat.bas | per_beat.hex |
Circuit Overview:
Midi Mapping
Worked out, such as to have maximum compatibility with <Troms> and <Simba>
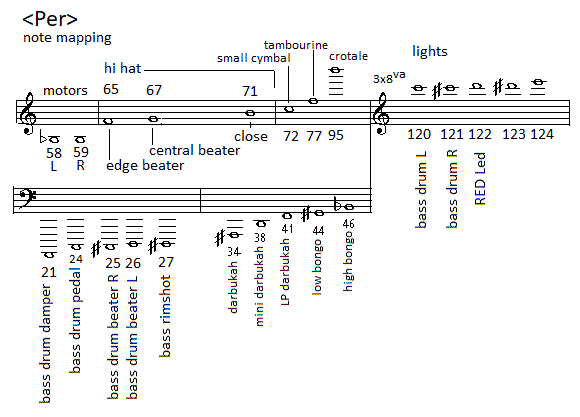
Midi implementation:
The midi channel for <Per> is 6 (0-15) or 7 (1-16).
Midi note range: 21 - 95., Velocity implemented to steer the attack force of the beaters, the hi-hat and the tambourine. For the lights, the velo-byte steers the flashing speed. note aftertouch (polyphonic) under development.
Note Off commands are not required for the drums, note release is not implemented. Note off is mandatory for the hi-hat. If you leave them on for too long, the solenoids get very hot.
Key pressure is implemented for automatic note repeats. The pressure value determines the repetition speed. Maximum repetition speed is 16Hz, but if such fast values are used, velocity values have to be kept at very low values. It is obvious that when the repetition length is shorter than the velocity pulse length, repetition will not work. Also, note that repeats using key pressure are 'sticky'. The setting is not canceled with a note off. So, once set all new note-on commands will lead to repeated notes, unless key pressure is set to zero again.
Note that as far as the damper is concerned (note 21), the key pressure controls the force exerted by the damper on the skin. Thus, pressure modulation is possible. Pressure values higher than 86 should be avoided. These higher values are only implemented to make short accents possible.
Controllers:
Controller #21 can be used to control the attack velocity of the damper. The default and reset value for this controller is value 1. At high values, the damper will operate as a soft beater on the bass drum.
Controller #30 is used to set repetition speed for all notes to one and the same value. The parameter determines the repetition speed. (Range 2Hz to 16Hz for values from 1 to 127). Repetitions start on reception of a note-on command. Thus, phase shifts of the repetition frequency will occur if notes are not started at the same time. This controller, with value 0 can also be used to cancel all repeats.
Controller #66 is used to switch the robot on or off. Switching the robot off, resets all controllers to their default values..
Controller #71: Controls the PWM value for the voltage during the velo-time on the hihat. Default and reset value is 64.
Controller #123: <Per> responds to the midi all-notes-off command. This command also switches off the lights.
Keypressure:
Note #21: Steers the pushing force of the damper against the drumskin. Safe maximum value = 86. Higher values can only be used for very short hold-times.
Note #71: Steers the hold force on the hihat cymbal during cymbal close. Default and reset value is 64.
Notes 120 to 122: Changes the flashing speed of the lights.
Technical specifications:
Design and construction: dr.Godfried-Willem Raes (2018)
Collaborators on the construction of this robot:
Music composed for <Per>:
| Back to Logos-Projects page : projects.html | Back to Main Logos page:index.html | To Godfried-Willem Raes personal homepage... | To Instrument catalogue |  |
Robot: <Per>
Er is geen Nederlandse beschrijving beschikbaar. Aangezien we geen strukturele erkenning en ondersteuning krijgen van de Vlaamse Gemeenschap zal daar ook niet meer aan gewerkt worden.
| Building logbook | Bouwdagboek |
| Following diary given an idea of the work involved in the making of the <Per> robot. It also illustrates the building process. |
Omdat ons vaak wordt gevraagd hoeveel werk en tijd kruipt in, en nodig is voor, het bouwen van dergelijke muzikale robots, houden we ook voor <Per> een beknopt en geilllustreerd bouwdagboek bij: |
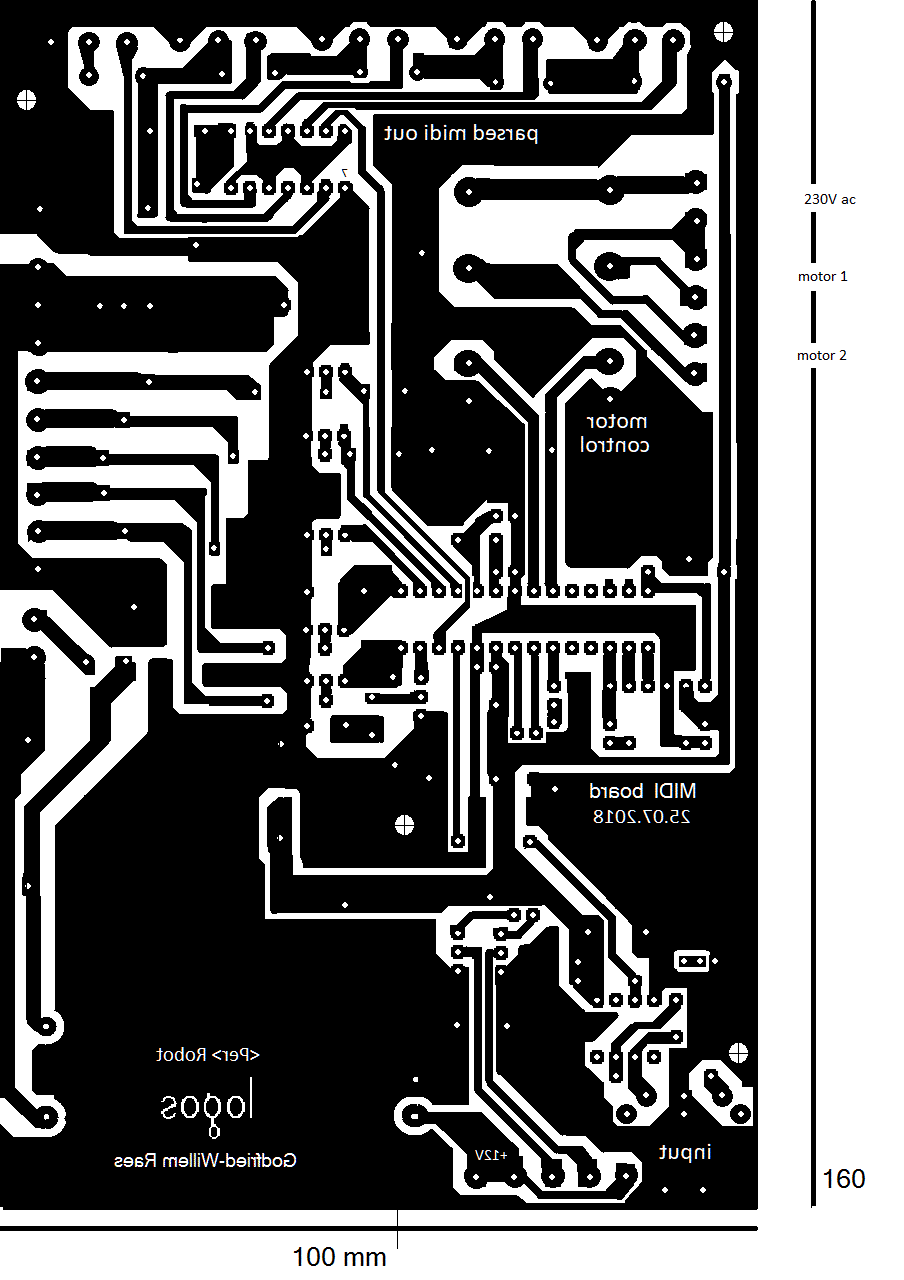
 Mounting
plate drilled for circuitry.
Mounting
plate drilled for circuitry. The horizontal
axis is not drawn to scale. The force is a function of the current flowing
through the solenoid and this current is also a function of the position of
the anchor. This is easy to understand as the inductance of the solenoid will
be at maximum when the anchor is fully inside the coil, hence in this position
the current will be at minimum. Current will be at maximum when the anchor
is fully pulled out of the solenoid. The springlike behavior of the anchor
when its in a central position is clear from the curve. We still have to measure
the forces in standard units, say Newton. The shape of the curve is a mere
first hypothesis. Force = Sin (Pi.s).Ic could also be a workable approximation.
The horizontal
axis is not drawn to scale. The force is a function of the current flowing
through the solenoid and this current is also a function of the position of
the anchor. This is easy to understand as the inductance of the solenoid will
be at maximum when the anchor is fully inside the coil, hence in this position
the current will be at minimum. Current will be at maximum when the anchor
is fully pulled out of the solenoid. The springlike behavior of the anchor
when its in a central position is clear from the curve. We still have to measure
the forces in standard units, say Newton. The shape of the curve is a mere
first hypothesis. Force = Sin (Pi.s).Ic could also be a workable approximation.
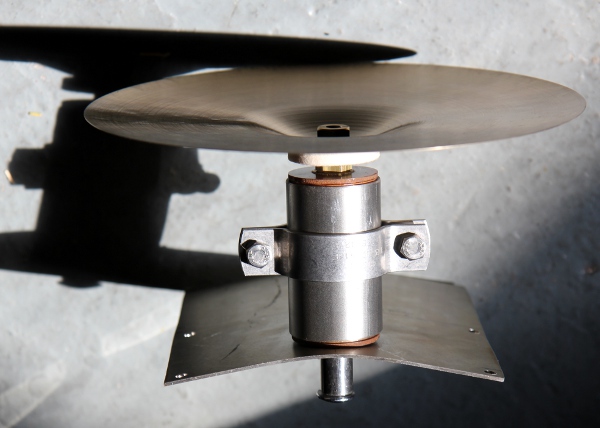 Holes
in the bass drum drilled to size. First tentative mount of the hi-hat on the
bass drum. Alignment fault is now 10 mm. To be adjusted. This is the first
mount:
Holes
in the bass drum drilled to size. First tentative mount of the hi-hat on the
bass drum. Alignment fault is now 10 mm. To be adjusted. This is the first
mount: 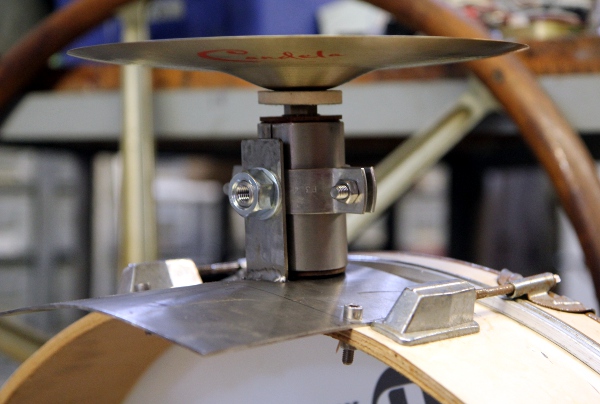 We still
have to construct the third point of attachment for the bass drum. This could
be a 30 x 3 length of flat stainless steel, welded on the sides and with a
M10 mounting hole to fit the solenoid bracket's internal thread.
We still
have to construct the third point of attachment for the bass drum. This could
be a 30 x 3 length of flat stainless steel, welded on the sides and with a
M10 mounting hole to fit the solenoid bracket's internal thread.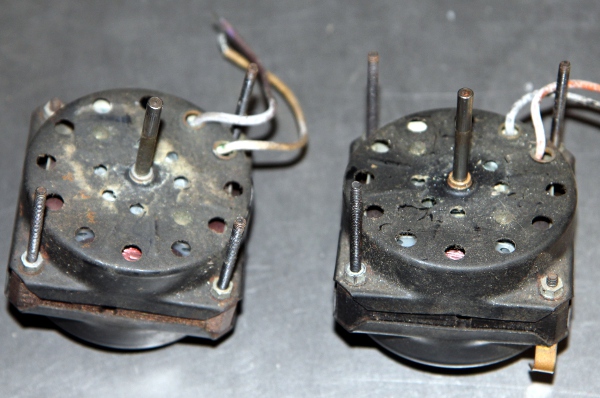

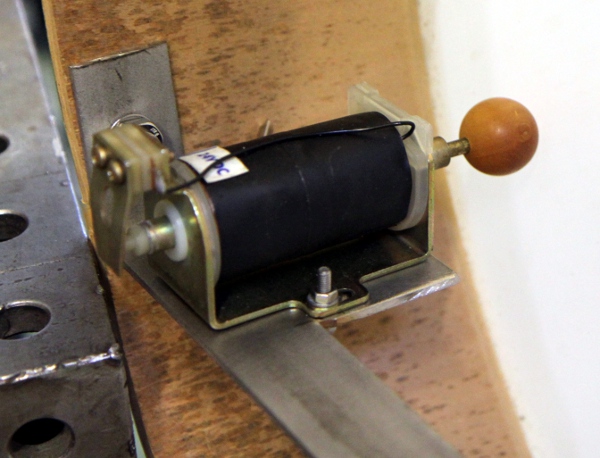 This solenoid is a recycled part taken from a Funke railway bell. It's capable
of very fast repeats. Mounting of the pedal bass beater:
This solenoid is a recycled part taken from a Funke railway bell. It's capable
of very fast repeats. Mounting of the pedal bass beater: 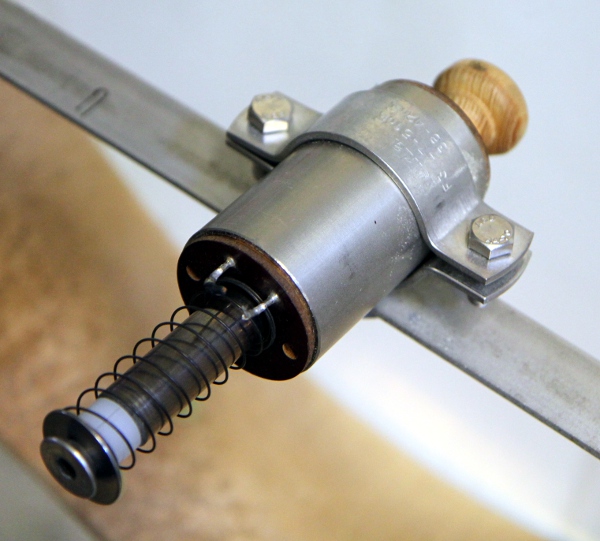
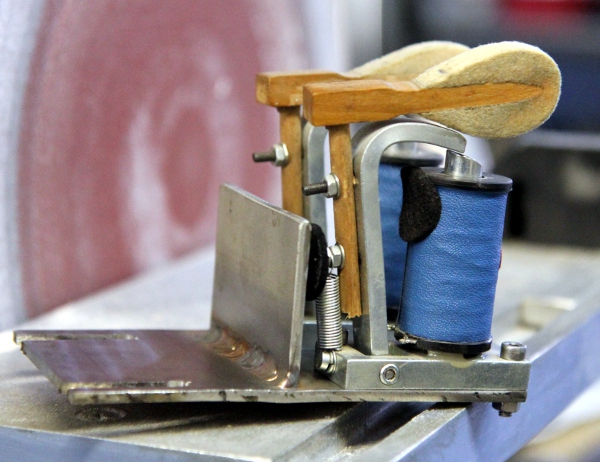 Here we use recycled piano hammers mounted on a solenoid.
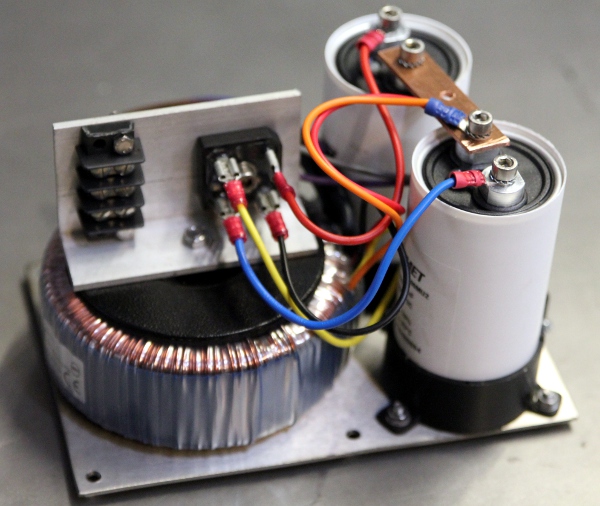
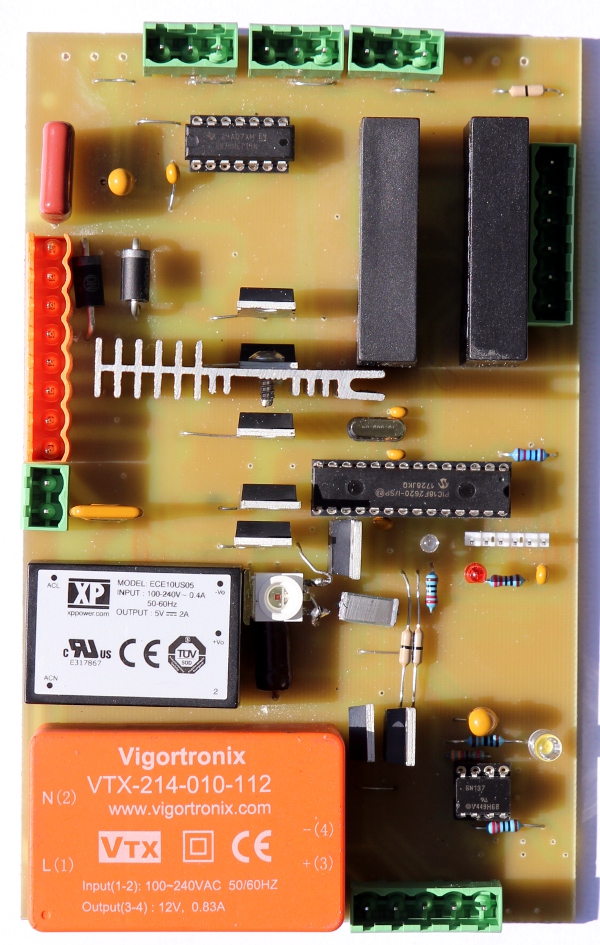 Start coding
for this newly made board. Here we will use a Microchip 18F2620 processor.
The implementation of the propellor motor control should be similar to the
code developed and tested on <Pos> earlier this year. The hub-board
takes care of the two propeller motors, the rimshot beater, the damper, the
twin beaters the 1W on board bright red LED and the two 12V bulbs inside the
bass-drum.
Start coding
for this newly made board. Here we will use a Microchip 18F2620 processor.
The implementation of the propellor motor control should be similar to the
code developed and tested on <Pos> earlier this year. The hub-board
takes care of the two propeller motors, the rimshot beater, the damper, the
twin beaters the 1W on board bright red LED and the two 12V bulbs inside the
bass-drum. 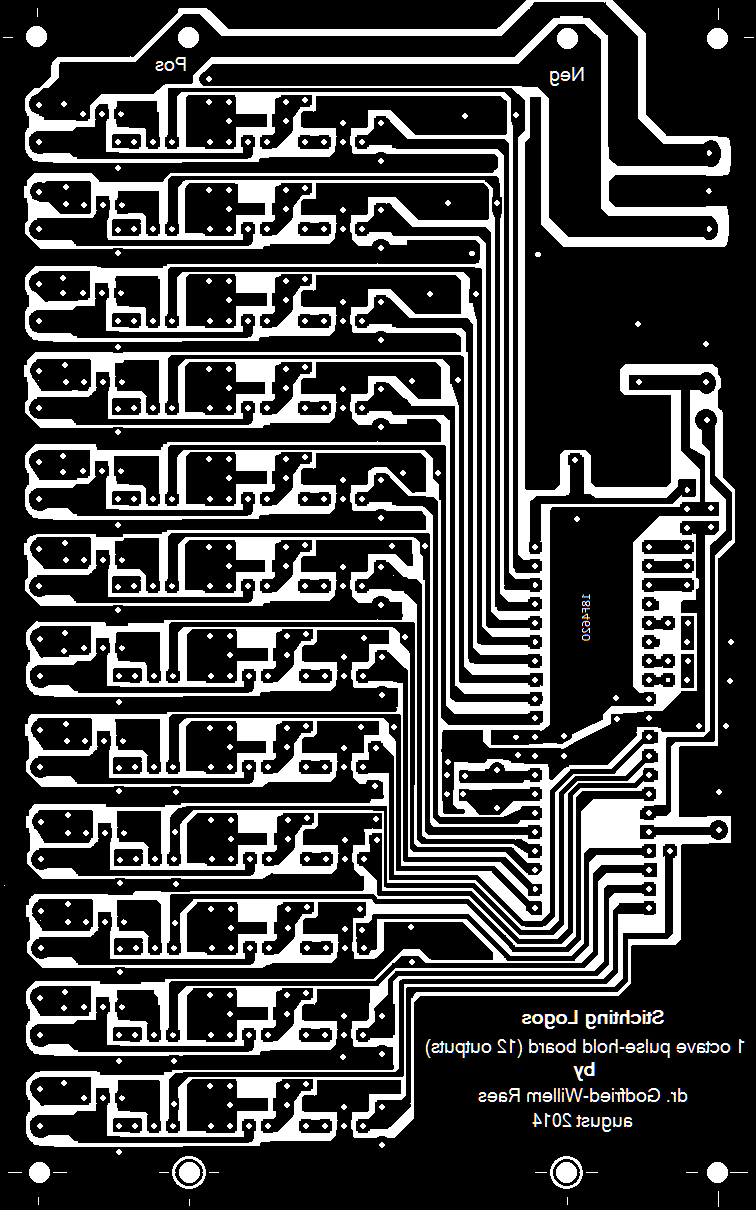 Note that common anode diodes in TO220 packages are used in this circuit.
The pulse/hold detail is: This
circuit is applied 12 times on the PCB. Here is the assembled PCB:
Note that common anode diodes in TO220 packages are used in this circuit.
The pulse/hold detail is: This
circuit is applied 12 times on the PCB. Here is the assembled PCB: 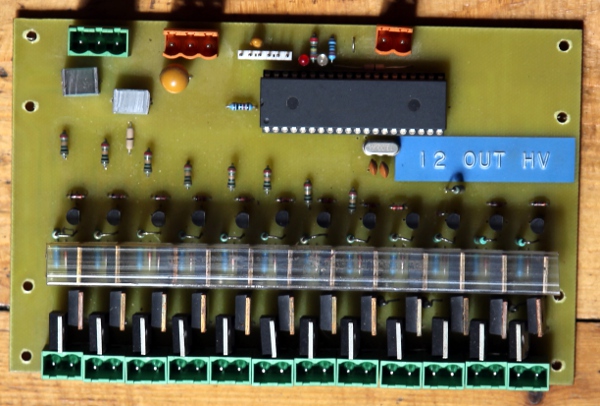 Start
writing the firmware for this board.
Start
writing the firmware for this board. 
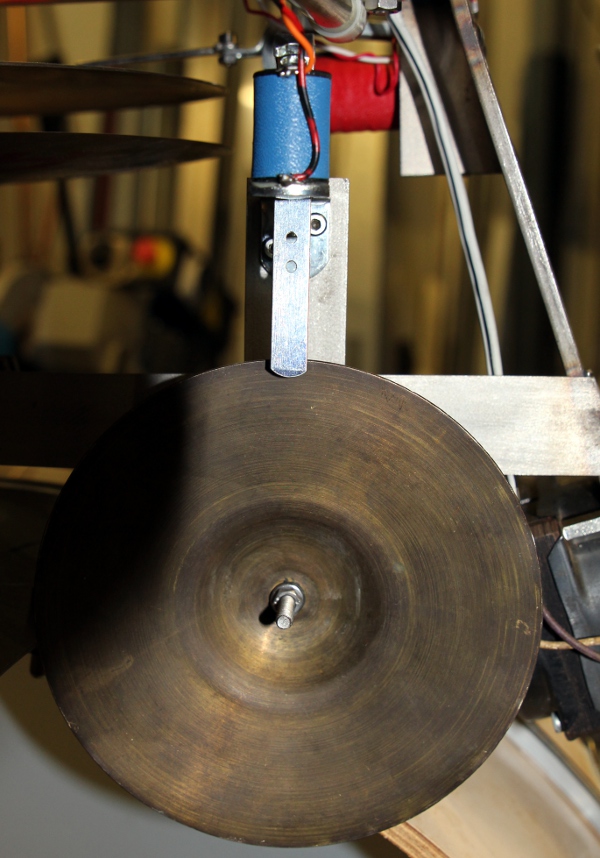
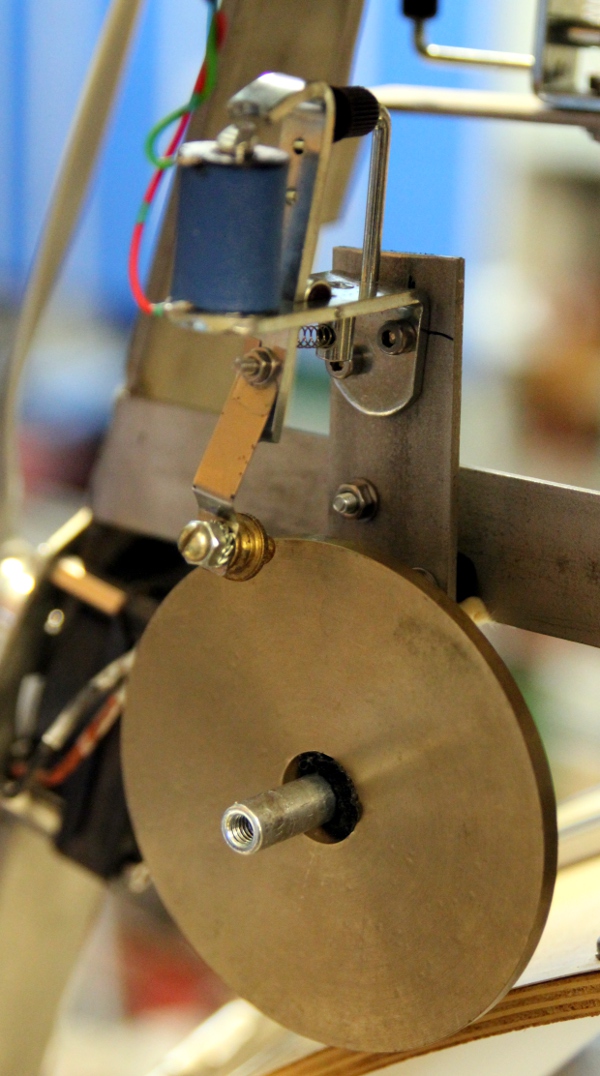 Note the blade spring and the brass beater. An elastic mount for the crotale
is essential for a good sound.
Note the blade spring and the brass beater. An elastic mount for the crotale
is essential for a good sound.
To be done
Robodies Pictures with <Per>:
'Peroxide' performance, 10.11.2018

| (Terug) naar logos-projekten: | Terug naar Logos' index-pagina: | Naar Godfried-Willem Raes personal homepage... | Naar katalogus instrumenten | |
Last update: 2023-10-05 by Godfried-Willem Raes
Technical data sheet and maintenance instructions:
| board output | mapping | wire color | remarks | PIC pin | function |
| 1 | bass drum pedal | red - blue | pulse/hold | 2,3 | RA0, RA1 |
| 2 | cymbal mid | red - white | pulse/hold | 4,5 | RA2, RA3 |
| 3 | small cymbal | pulse/hold | 6,7 | RA4, RA5 | |
| 4 | cymbal edge | green - red | pulse/hold | 8,9 | RE0, RE1 |
| 5 | crotale | pulse/hold | 10, 15 | RE2, RC0 | |
| 6 | hihat | red - grey/blue | pulse/hold - PWM 1-2 | 16, 17 | RC1, RC2 |
| 7 | drum1 | red - grey/blue | pulse/hold | 18, 19 | RC3, RD0 |
| 8 | drum2 | red/orange - purple | pulse/hold | 20, 30 | RD1, RD7 |
| 9 | drum3 | red/black - blue | pulse/hold | 29, 28 | RD6, RD5 |
| 10 | drum4 | pink - black/white | pulse/hold | 27, 24 | RD4, RC5 |
| 11 | drum5 | red/white - yellow/black | pulse/hold | 23, 22 | RC4, RD3 |
| 12 | tambourine | red - blue | pulse/hold | 21, 33 | RD2, RB0 |
| - | red LED watchdog | - | on/off | 36 | RB3 |
| - |
blue LED CC66 |
- | on/off | 34 | RB1 |
| board output | mapping | wire color | remarks | PIC pin | function |
| 1 | note 58 propeller1 | white/white-black | slow pwm on 230V | 6 | RA4 |
| 2 | note 59 propeller2 | white/white-black | slow pwm on 230V | 7 | RA5 |
| 3 | rimshot | red / brown | pulse only | 11 | RC0 |
| 4 | damper | white / grey | PWM | 12 | RC1 |
| 5 | note 123 | blue LED light bulb | PWM | 13 | RC2 |
| 6 | twin 1 | red/black - purple | pulse only | 14 | RC3 |
| 7 | twin 2 | orange - yellow | pulse only | 15 | RC4 |
| 8 | note 122 | none | Red 1W LED on board | 16 | RC5 |
| 9 | note 120 | pink - green/yellow | 12V lite 400mA max | 21 | RB0 |
| 10 | note 121 | red/green - yellow/black | 12V lite 400mA max | 22 | RB1 |
| - | red LED watchdog | - | on/off | 26 | RB5 |
| - |
blue LED CC66 |
- | on/off | 23 | RB2 |
PIC processor firmware:
Disassembly and servicing instructions:
This robot uses drums with mostly natural skins. Hence it has to be protected from moisture. For servicing, the robot can be but flat on either frame side. Do not stand it on the bass drum for a long time. Before adjusting any mechanical parts, make sure the power supply cable is fully disconnected. After disconnecting wait five minutes to allow the capacitors to discharge. This robot uses quite high voltages and hence touching parts involves a risk.
Cost Calculation for this building project:
| Item - Qty. | specs. | Booking reference | cost |
| 6 m | stainless steel 50 x 5 | 310,- | |
| 2 m | stainless steel 30 x 3 | 73,- | |
| 1 m2 | stainless steel 3mm thick, plate | 245,- | |
| 1 | Latin Percussion miniature drumset (4 drums) | onknot, gwr 02.06 | 110,- |
| 1 | Regular Turkish Darbukah | onknot.gwr 02.06 | 40,- |
| 1 | miniature darbukah | onknot.gwr 02.06 | 25,- |
| 100 | M3 hex-cylinder bolts | 35,- | |
| 100 | M3 stainless steel nuts | 25,- | |
| 100 | M4 hex-cylinder bolts | 40,- | |
| 100 | M4 stainless steel nuts | 35,- | |
| 1 | 3/8" threaded rod | 17,- | |
| 5 | 3/8" brass nuts | 15,- | |
| 4 | Sandvik steel sawblades | 10,- | |
| 1 | Funke electric bell (for mechanism) 24 V | onknot gwr 02.06 | 50,- |
| 10 | Laukhuff pallet valve solenoids | 585,- | |
| 2 | Siemens open solenoids 1A / 60V | 140,- | |
| 1 | Blacknigth pull solenoid 24V | 65,- | |
| 1 | Brass shell tambourine - brass shells | 22,- | |
| 1 | set of 2 hihat cymbals | bnp J21 - Thoma Okaze | 129,- |
| 1 | soft steel rod, massive, 17 mm diameter, 300 mm long | 11,- | |
| 1 | wood handgrip, lathe turned hardwood | onknot.gwr 02.06 | 2,- |
| 10 | hardwood wood balls, 20 mm diameter | 10,- | |
| 6 m | stainless steel tube, 50 mm x 2 mm | 80,- | |
| 2 | stainless steel brackets 46 - 54 mm | 24,- | |
| 10 | felt rings, Laukhuff | 17,- | |
| 1 | spring, diameter 22 mm, 100 mm long | 3,- | |
| 1 | bass drum, Pulse Percussion | onknot.gwr 02.06 | 120,- |
| 20 | M10 stainless steel cylinder head bolts | 60,- | |
| 25 | M10 stainless steel nuts | 25,- | |
| 12 | shock absorbers | 72,- | |
| 1 | stainless steel flange, diameter 160 mm | 27,- | |
| 1 | Argon gas cylinder | 120,- | |
| Welding electrodes | 175,- | ||
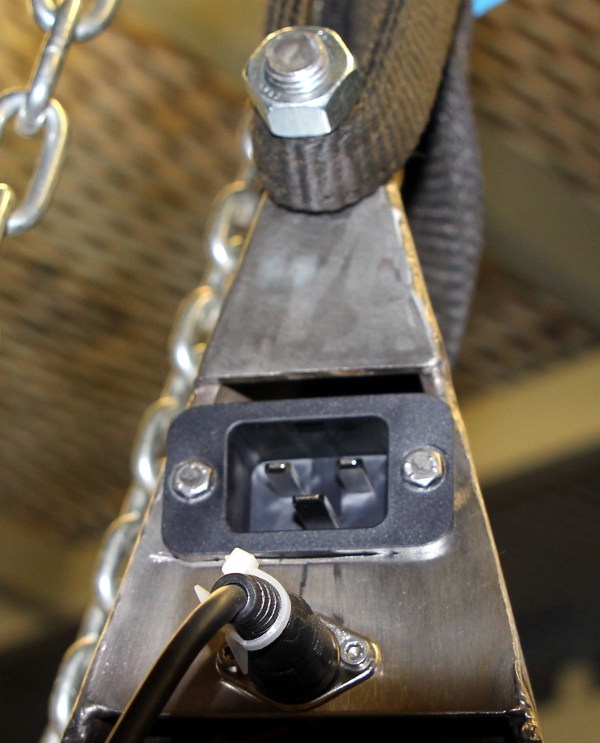
| 1 | IEC mains entry block | 8,- | |
| 1 | Power switch | 12,- | |
| 1 | M16 nut, stainless steel | 3,- | |
| 10 | cutting discs 0.8 mm | 14,- | |
| 1 | 16 mm drill Cobalt | 12,- | |
| 1 | 10 mm drill Cobalt | 8,- | |
| 1 | Ijzerwaren De Coene | bnp J17 - De Coene-Simons | 148,- |
| 1 | DIN connector, chassis for MIDI input | 3,- | |
| Cutting and grinding discs Farnell | bpost J68 | 39,71- | |
| 1 | Meteor shield, Farnell | bpost J68 | 40,87- |
|
Cutting disks Rapido, Farnell |
bpost J68 | 3,36- | |
| Welda electrodes | bpost J68 | 471,66- | |
| Conrad Faktuur 1978095522 | bpost | 118,85- | |
| Onknot. gwr 18.08 | J125 @ kas | 511,00- | |
| 1 | Avedis Zyldian crotale B | ||
| 1 | Small cymbal | ||
| 4 | Shore 80 bobbin mounts M4 MM | ||
| 2 | Siemens 250VA solenoids | ||
| 1 | Kettingtakel 500kg | ||
| Onknot. gwr 17.09 | J137 @ kas - ophanging <Per> | 165,00- | |
| 1 | Bulging plugs and connectors 13 A & montagemiddelen | Farnell, F2306756 | 192,41- |
| 1 m | 10 mm thick felt | ||
| 3 | 12 V LED light bulbs E14 socket | ||
| 3 | E14 sockets | ||
| TOTAL (expended so far) | 3956,86- |
On the original budget but not yet expended:
| nr | description |
cost
|
remarks
|
| 1 | Hub PCB |
520,-
|
|
| 1 | pulse PCB |
520,-
|
|
| 3 | Power supplies |
600,-
|
|
| 2 | motors - Truvox |
600,-
|
from stock |
| sensing components |
450,-
|
||
| 6 | lights |
-,-
|
from stock
|
| TOTAL: (first estimated total) |
5212,-
|
Labor
calculation based on 273 Euro/day, which is the wage cost derived from our payrolls in 2017.
(Invoiced by self employed collaborators Bert Vandekerckhove, Johannes Taelman a/o.)
| Days | task |
cost
|
remarks
|
| ? | design |
81,-
|
pro memorie
|
| 3 | firmware design |
819,-
|
|
| 10 | welding and mechanical assembly |
2730,-
|
|
| 2 | testing and adjusting |
546,-
|
|
| TOTAL: |
4176,-
|
Total estimated cost: 9.388 Euro