|
Microtonal Musical Robot Research project on the development of new tools for musical expression at the University College Ghent - School of Arts |
|
<Asa>
an automated alto saxophone Godfried-Willem RAES 2013-2014 |
|
Microtonal Musical Robot Research project on the development of new tools for musical expression at the University College Ghent - School of Arts |
|
<Asa>
an automated alto saxophone Godfried-Willem RAES 2013-2014 |
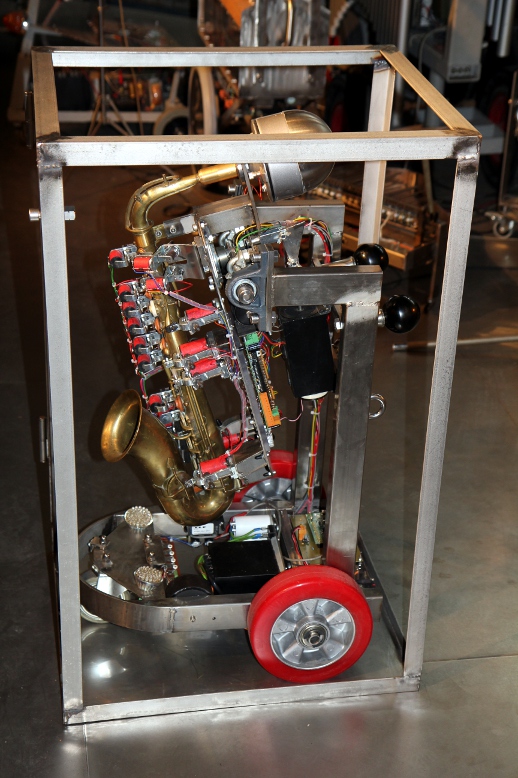
Robot: <Asa>
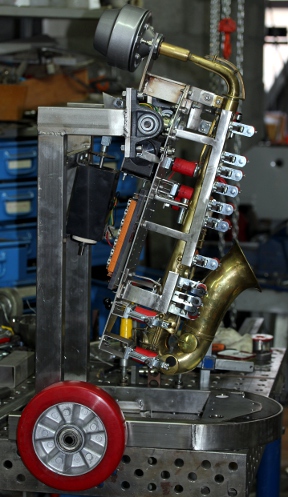
The instrument used to start off this robot building project was an alto saxophone
made by Ancienne Maison Muller, Louis Cousin successeurs, in Lyon, France. This
is the label: 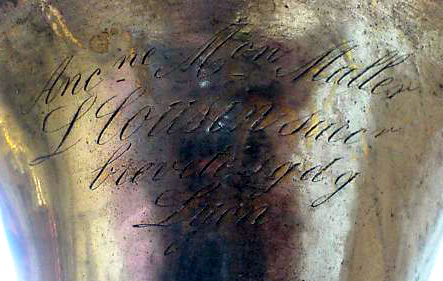 We
presume it dates from the early interbellum, as it must have been made after
the death of the late Louis Cousin. Certainly not older than 1890. We started
by thoroughly cleaning and restauring the instrument and bringing it back to
full playing conditions. This it what it looked like as we got it:
We
presume it dates from the early interbellum, as it must have been made after
the death of the late Louis Cousin. Certainly not older than 1890. We started
by thoroughly cleaning and restauring the instrument and bringing it back to
full playing conditions. This it what it looked like as we got it: 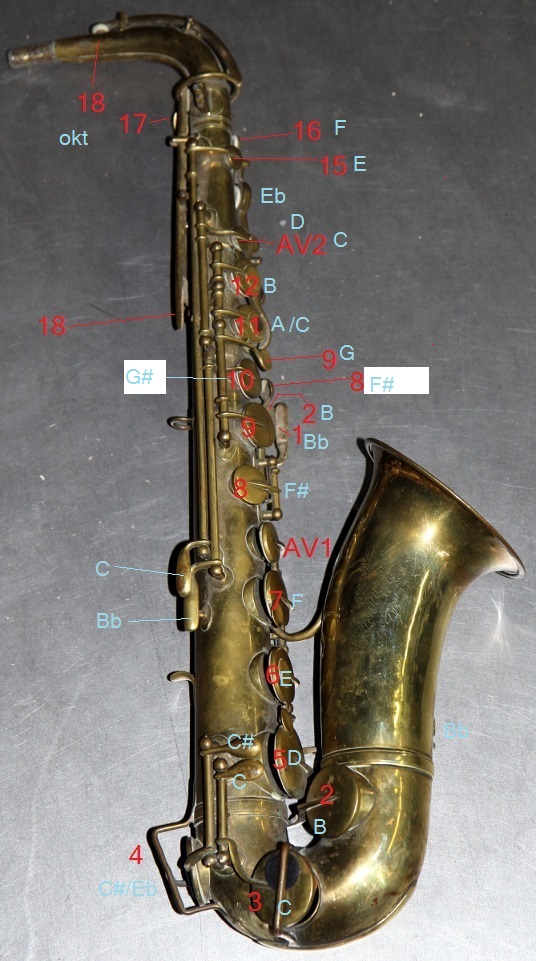 As
it is a pretty old instrument, it misses some features in the mechanism typical
for more modern instruments, such as automatic octave keying, palm keys and
a few trill keys. An advantage as it turns out, for an instrument to be automated.
This is the fingering for <Asa>:
As
it is a pretty old instrument, it misses some features in the mechanism typical
for more modern instruments, such as automatic octave keying, palm keys and
a few trill keys. An advantage as it turns out, for an instrument to be automated.
This is the fingering for <Asa>: 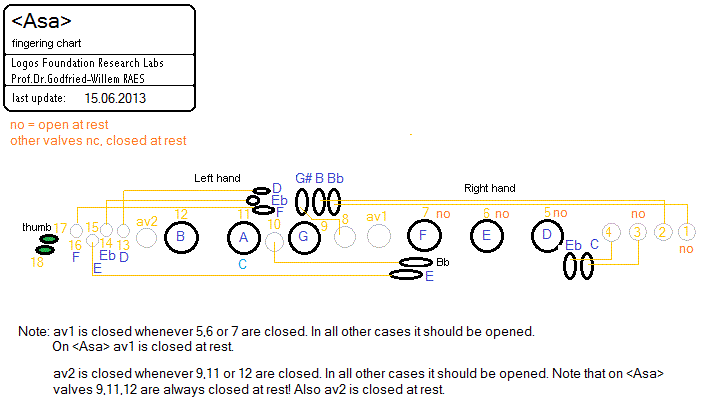 Following
the recipe applied in most of our wind-instrument robots sofar, we decided to
drive the saxophone using a membrane compression driver followed by an acoustic
impedance convertor. This convertor with its typical double coned design with
a capilary connecting both cones, had to be calculated anew, as it had to fit
the drive requirements for an alto saxophone. Our design is an attempt to match
as closely as possible the characteristics of a normal mouthpiece with a reed
for such an instrument. The design resulted in following drawing,
Following
the recipe applied in most of our wind-instrument robots sofar, we decided to
drive the saxophone using a membrane compression driver followed by an acoustic
impedance convertor. This convertor with its typical double coned design with
a capilary connecting both cones, had to be calculated anew, as it had to fit
the drive requirements for an alto saxophone. Our design is an attempt to match
as closely as possible the characteristics of a normal mouthpiece with a reed
for such an instrument. The design resulted in following drawing, 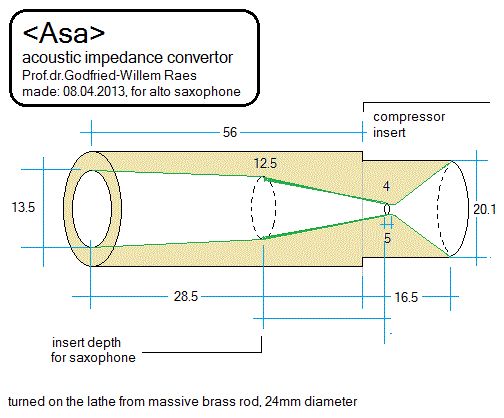 which we constructed in real on the lathe from a piece of solid brass rod. The
picture shows both our impedance convertor and the modeled mouthpiece:
which we constructed in real on the lathe from a piece of solid brass rod. The
picture shows both our impedance convertor and the modeled mouthpiece:  For obvious reasons, the quite complicated internal bore cannot be made visible
in a photograph. To make the central conical part, we grinded an existing 12mm
drill to a conical shape of the required proportions on the lathe, putting the
drill bit rotating in the chuck of the lathe and grinding it off with an angular
grinder.
For obvious reasons, the quite complicated internal bore cannot be made visible
in a photograph. To make the central conical part, we grinded an existing 12mm
drill to a conical shape of the required proportions on the lathe, putting the
drill bit rotating in the chuck of the lathe and grinding it off with an angular
grinder.
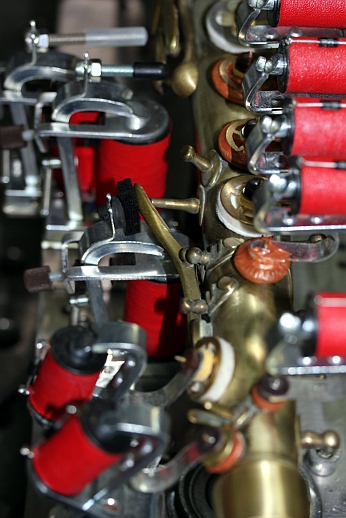
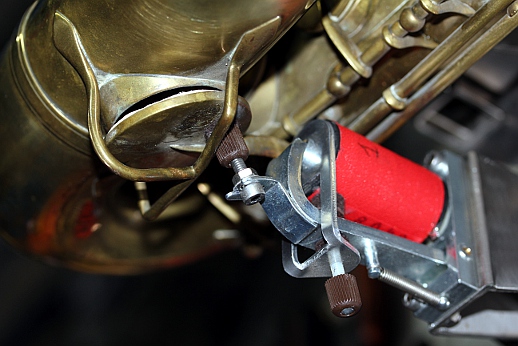
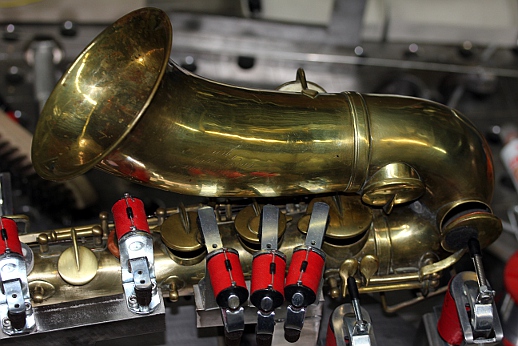
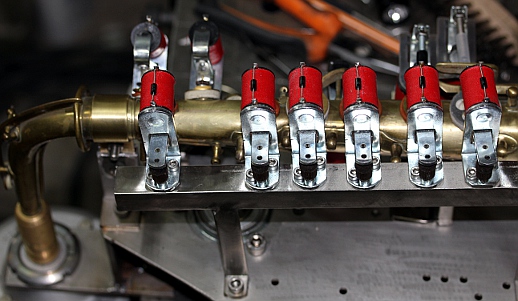
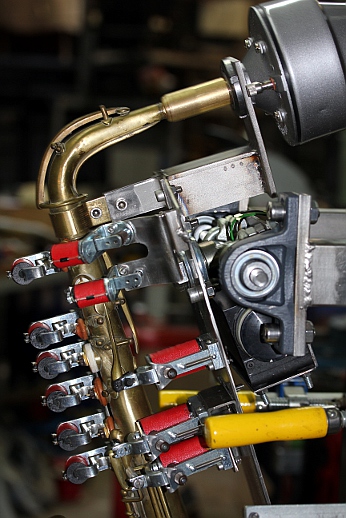
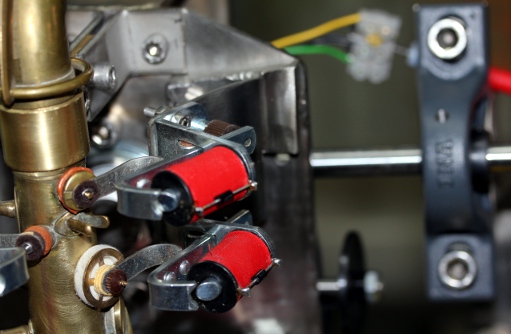
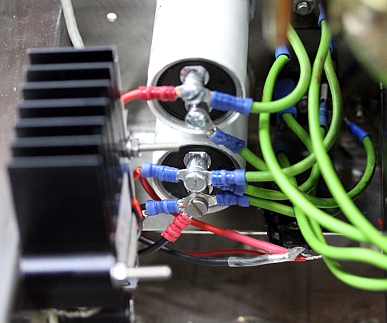
For the implementation of the valves, we could build further on the experience we had build up during the realisation of our <Klar> robot. In fact, the case of a saxophone is even a bit easier as there are less valves that have to be operated. The two octave valves appeared to be dispensible, as with our driver mechanism the octaves actually even sound better without activation of these keys. So the double octave valve on the crook as well as the lower thumb operated valve could be left closed all the time. This left us at first sight with no more than 16 valves to be automated. However the native mechanism on a saxophone tends to be rather noisy. Therefore we decided to replace as many of the valves, pads and mechanisms as possible with solenoid driven pads acting directly on the tone holes. Therefore we unsoldered the posts holding the mechanism for valves 9,10,11,12, Av2, 15,16, 17 and 18. The mechanism on the crook for the double octave, although not required, was left in place as well as valve 8, as we found no place for a directly driven solenoid pad here. The 'automatic' valves Av1 and Av2 thus also required solenoids, bringing the total up to 18 valves.
Power supply voltages and currents:
Midi Mapping and implementation:
Midi channel : 3 (counting 0-15).
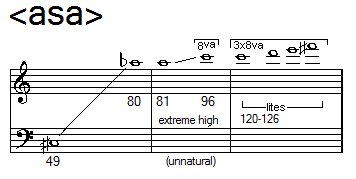
Midi note range: 49-92. Note on, velocity is implemented and has a wide control
range.
Note Off commands are required, but can be dropped for pure legato playing.
A note-off releases the valves and unpowers them. It starts the fast decay section
of the mouth driver.
The lights are mapped on notes as follows:
With velocity values between 1 and 126, the lights will be flashing with speeds proportional to the velocity value. To switch them just on, use velo = 127. Velo=0 switches them off.
Controllers:
Controller 1: Wind controller, steers the amount of noise in the sound. Default
= 3. Advised setting: 6
Controller 2: LFO3 frequency applied to the filter. Default = 2. Advised setting:
1
Controller 3: Vibrato depth (LFO1 amplitude). Default = 20. Advised setting:
20, to turn vibrato off, set this controller to 0.
Controller 4: Vibrato speed. (LFO1 frequency). Default = 8. Advised setting:
8
Controller 5: Tremolo depth, amplitude modulation. (LFO2). Default = 0. Advised
setting: 2
Controller 6: Tremolo speed. (LFO2 frequency). Default = 0. Advised setting:
14
Controller 7: Global volume control. Can be used for crescendo and decrescendo
effects whilst notes are sounding. This also affects the sound color of the
instrument. Default = 80
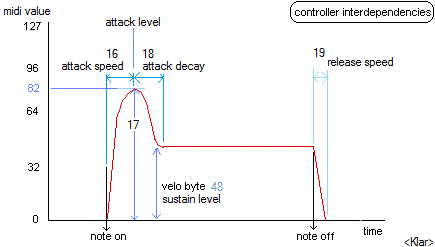
Controller 16: Note attack speed controller (0= slow attack, 127= fast attack)
. Default setting: 100. Advised setting: 20
Controller 17 is used to control the maximum sound level reached after the attack
time. This controller is always larger than or equal to the level set by the
velocity byte. For sfz or staccato playing, this controller must be set to high
levels and the velocity byte kept rather low. Default setting: 127. Advised
setting: 120
Controller 18 is used to control the speed of the transition between the attack
level once reached and the sustain or hold value set by the velocity byte.(0=
slow transition, 127= fast transition) default setting: 90. Advised setting
85
Controller 19: is used to control the release time after reception of a note
off. Here again a value of 0 will give a slow release whereas a value of 127
will give a very fast release. Note that with very low values, the note may
not even turn off completely. Default setting: 96. Advised setting: 89. Note
that if real note-off commands are used, the release value sent with them, if
this value is not zero, will override controller 19, such that the value of
controller 19 will be set to 128-release value.
The following graph gives a picture of the mutual dependencies of controllers 16 to 19.
Controller 20: Basic tuning of the instrument. The range is + or - a semitone.(Defaults
to value 64 for A=440Hz)
Controller 22: Vertical inclination controller (gradual). (0-63= backwards,
64=central, unpowered, 65-127= forwards). (default = 64)
Controller 23: Left-right inclination controller (discrete) (0-63= left, 64=central,
unpowered, 65-127= right). (default = 64)
Controller 25: Filter cut off frequency. Default = 62. Advised setting: 100
Controller 26: Filter resonance amount. Default = 90. Advised setting: 81
Controller 27: Echo mix. Default = 0. Only use this for experimental sounds,
as it can generate multiphonics.
Controller 28: echo feedback. Default = 0. Only use this for experimental sounds,
as it can generate multiphonics.
Controller 29: LFO3, filter depth. Default = 20. (large values give a wha-wha
effect) Advised setting: 10
Controller 30: Valve release time out.(only used for code development) By default
this takes the value 100.
Controller 31: Does the same thing as aftertouch: fingered vibrato. However,
it does not require to be sent again and again in a sequencer. The parameter
sets the fingered vibrato speed. Default = 0
Controller 40: Bendrange for the pitchbend. 0= no bending, 1=+/- 50 cents. Default
= 1.
Controller 43: Wait time for vibrato start after reception of a note-on command.
Note that in legato playing, vibrato will continue. The wait time starts again
after a note off is received. Default = 100.
Controller 44: Wait time for the tremolo (AM modulation) to start after a note-on
command. Default = 10. Advised setting 19
Controller 66: Power on/off switch (0 = off, any other value is on). Power off,
resets all controllers to their cold-boot values.
Controller 100: special fingerings , bit settings for valves 1 to 7
Controller 101: special fingerings, bit settings for valves 8 to 14
Controller 102: special fingerings, bit settings for valves 15 to 18
Controller 123: switches the sounding note off, unpowers the movement solenoids,
dims all the lights. Does not reset any controllers.
Pitch bend: implemented with a range of a semitone (a quartertone up or down). The coding for a fragment of a quartertone scale (here shown for the <Heli> robot, but its identical for <Asa>) is as follows:
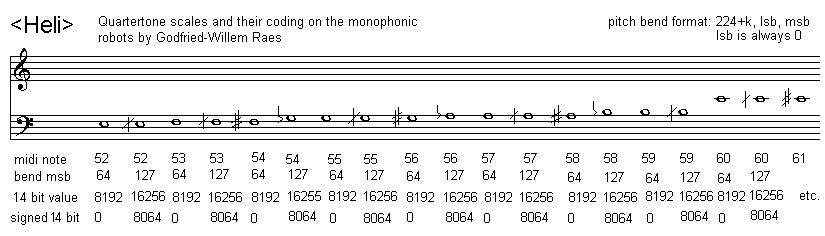 Most good sequencer
software (such as Cakewalk or Sonar) uses the signed 14 bit format. Note that
one unit of the msb corresponds exactly to a 0.78 cent interval. To convert
fractional midi to the msb only pitchbend to apply, follow following procedure:
if the fractional part is <= 0.5 then msb= 63 + (FRAC(note) * 128), if the
fractional part is larger than 0.5, we should switch on the note + 1 and lower
the pitch with msb= (1-FRAC(note)) * 128.
Most good sequencer
software (such as Cakewalk or Sonar) uses the signed 14 bit format. Note that
one unit of the msb corresponds exactly to a 0.78 cent interval. To convert
fractional midi to the msb only pitchbend to apply, follow following procedure:
if the fractional part is <= 0.5 then msb= 63 + (FRAC(note) * 128), if the
fractional part is larger than 0.5, we should switch on the note + 1 and lower
the pitch with msb= (1-FRAC(note)) * 128.
Technical specifications:
Design and construction: dr.Godfried-Willem Raes
Collaborators on the construction of this robot:
Music composed for <Asa>:
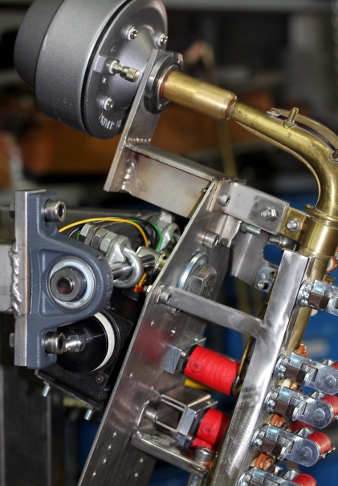
Pictures taken during the construction:

| Back to composers guide to the M&M robot orchestra. | Back to Main Logos page:index.html | To Godfried-Willem Raes personal homepage... | To Instrument catalogue |  |
Robot: <Asa>
een nederlandse beschrijving is niet beschikbaar.
Construction Diary:
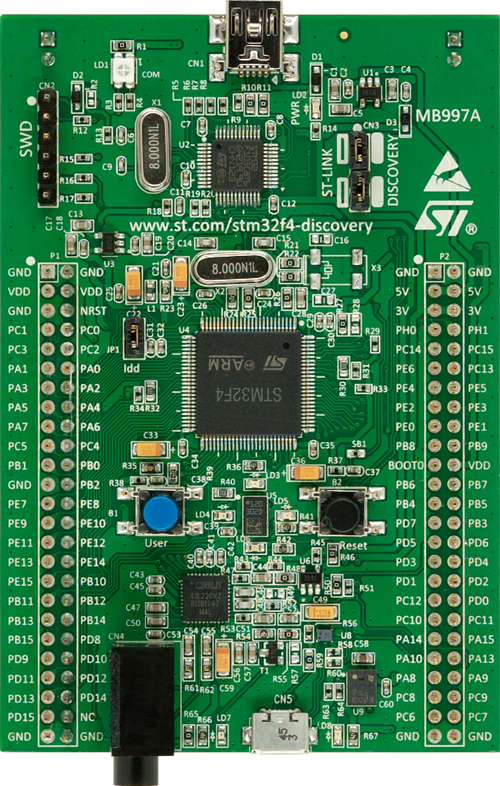 This is the board Johannes Taelman is working on for his AXO project. A
project description is here. (link to PDF file).
On the picture, the turned brass piece is shown as well as - for comparison-
an altosax mouthpiece:
Obviously we cannot show the quite complex internal bore of our impedance
convertor on the picture.
This is the board Johannes Taelman is working on for his AXO project. A
project description is here. (link to PDF file).
On the picture, the turned brass piece is shown as well as - for comparison-
an altosax mouthpiece:
Obviously we cannot show the quite complex internal bore of our impedance
convertor on the picture.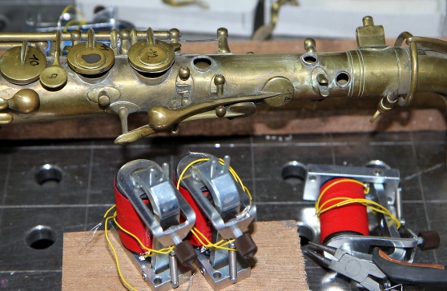
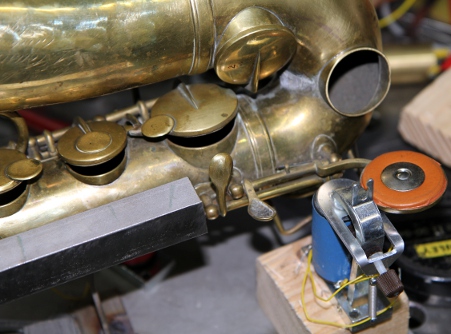
 AV1 valve removed from
the saxophone.
AV1 valve removed from
the saxophone.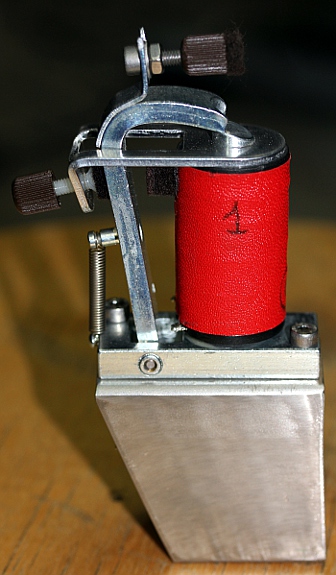

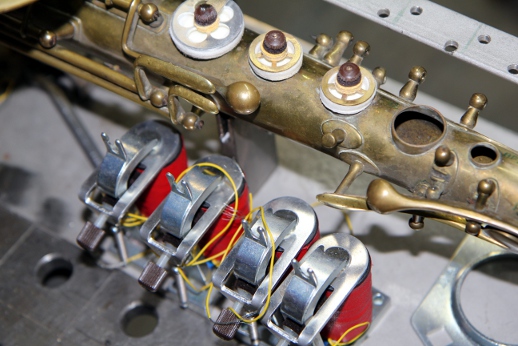
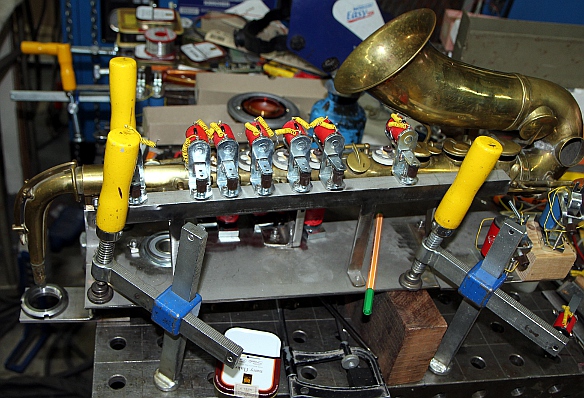
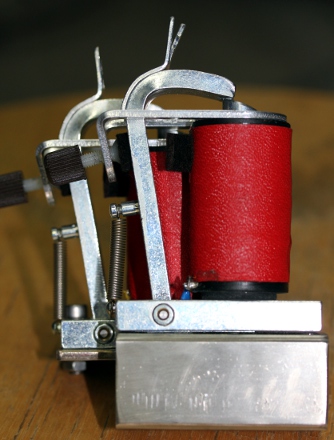 Fingering solenoid
assembly for valves 7,6 and 5 started. Pads for the valves 15, AV2, 12, 11,
10, 9 and AV1 mounted with Loctite 5920 brown silicon.
Fingering solenoid
assembly for valves 7,6 and 5 started. Pads for the valves 15, AV2, 12, 11,
10, 9 and AV1 mounted with Loctite 5920 brown silicon.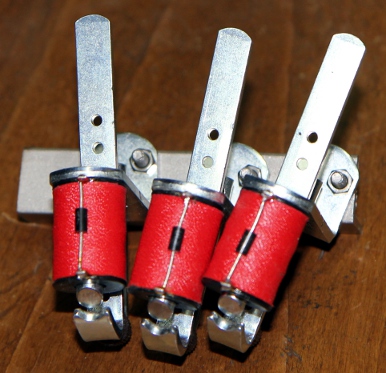 This
is a single unit.
This
is a single unit.  Fresh
stainless steel flew in from Demar-Lux.
Fresh
stainless steel flew in from Demar-Lux.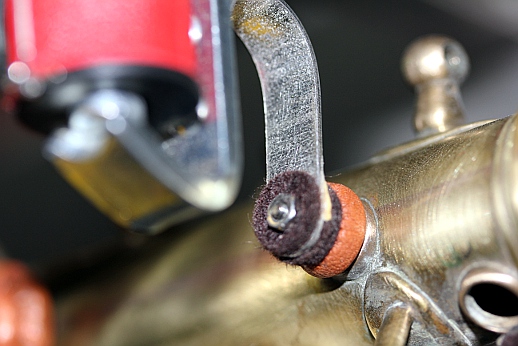
 Some of these pictures
posted on Facebook in the album robot details on my fan-page. Large in-between
clean-up of the workshop... Start mounting of the ball bearing for the horizontal
(left-right) movement. Axis made from a M20 stainless steel bolt. Through
this bolt we drilled a hole, 12mm diameter, to accomodate the axis for the
forward-backward movement. We still have to find out how to design the automation
of these two degrees of movement freedom. Mounting of the Laval-cone with
the capilary on the saxophone crook and mounting of the Padu compressor driver.
For sealing we used brown Loctite gasket silicone.
Some of these pictures
posted on Facebook in the album robot details on my fan-page. Large in-between
clean-up of the workshop... Start mounting of the ball bearing for the horizontal
(left-right) movement. Axis made from a M20 stainless steel bolt. Through
this bolt we drilled a hole, 12mm diameter, to accomodate the axis for the
forward-backward movement. We still have to find out how to design the automation
of these two degrees of movement freedom. Mounting of the Laval-cone with
the capilary on the saxophone crook and mounting of the Padu compressor driver.
For sealing we used brown Loctite gasket silicone.
 Position found for both the toroidal transformer and the ILP30 module on the
chassis. It may not be possible to mount a frontwheel with a brake mechanism
though. A difficult task on the menu: lifting the Asa assembly and mounting
it on the wheelbase to weld both together... More than two hours of mounting
work on the welding table to bring everything in place for this final welding.
Operation succeeded. Big difficulties encountoured in an attempt to mount
the first 200 mm wheel... apparently the 3 mm thick 20 mm diameter seamless
tube we used as an axis is not very precise 20mm... Even 50kN of force was
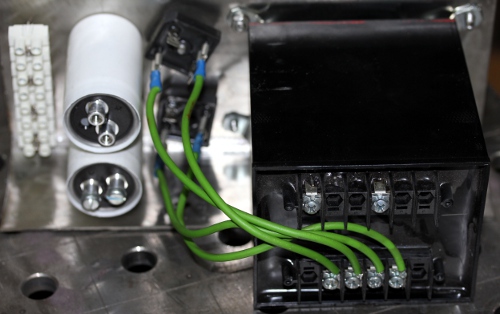
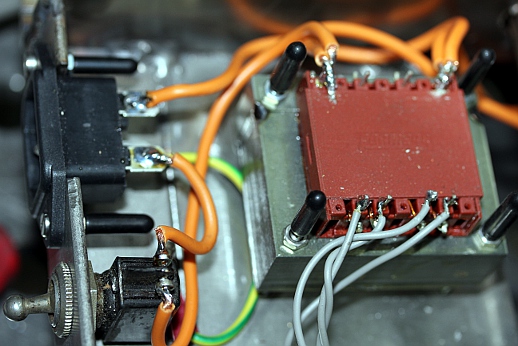
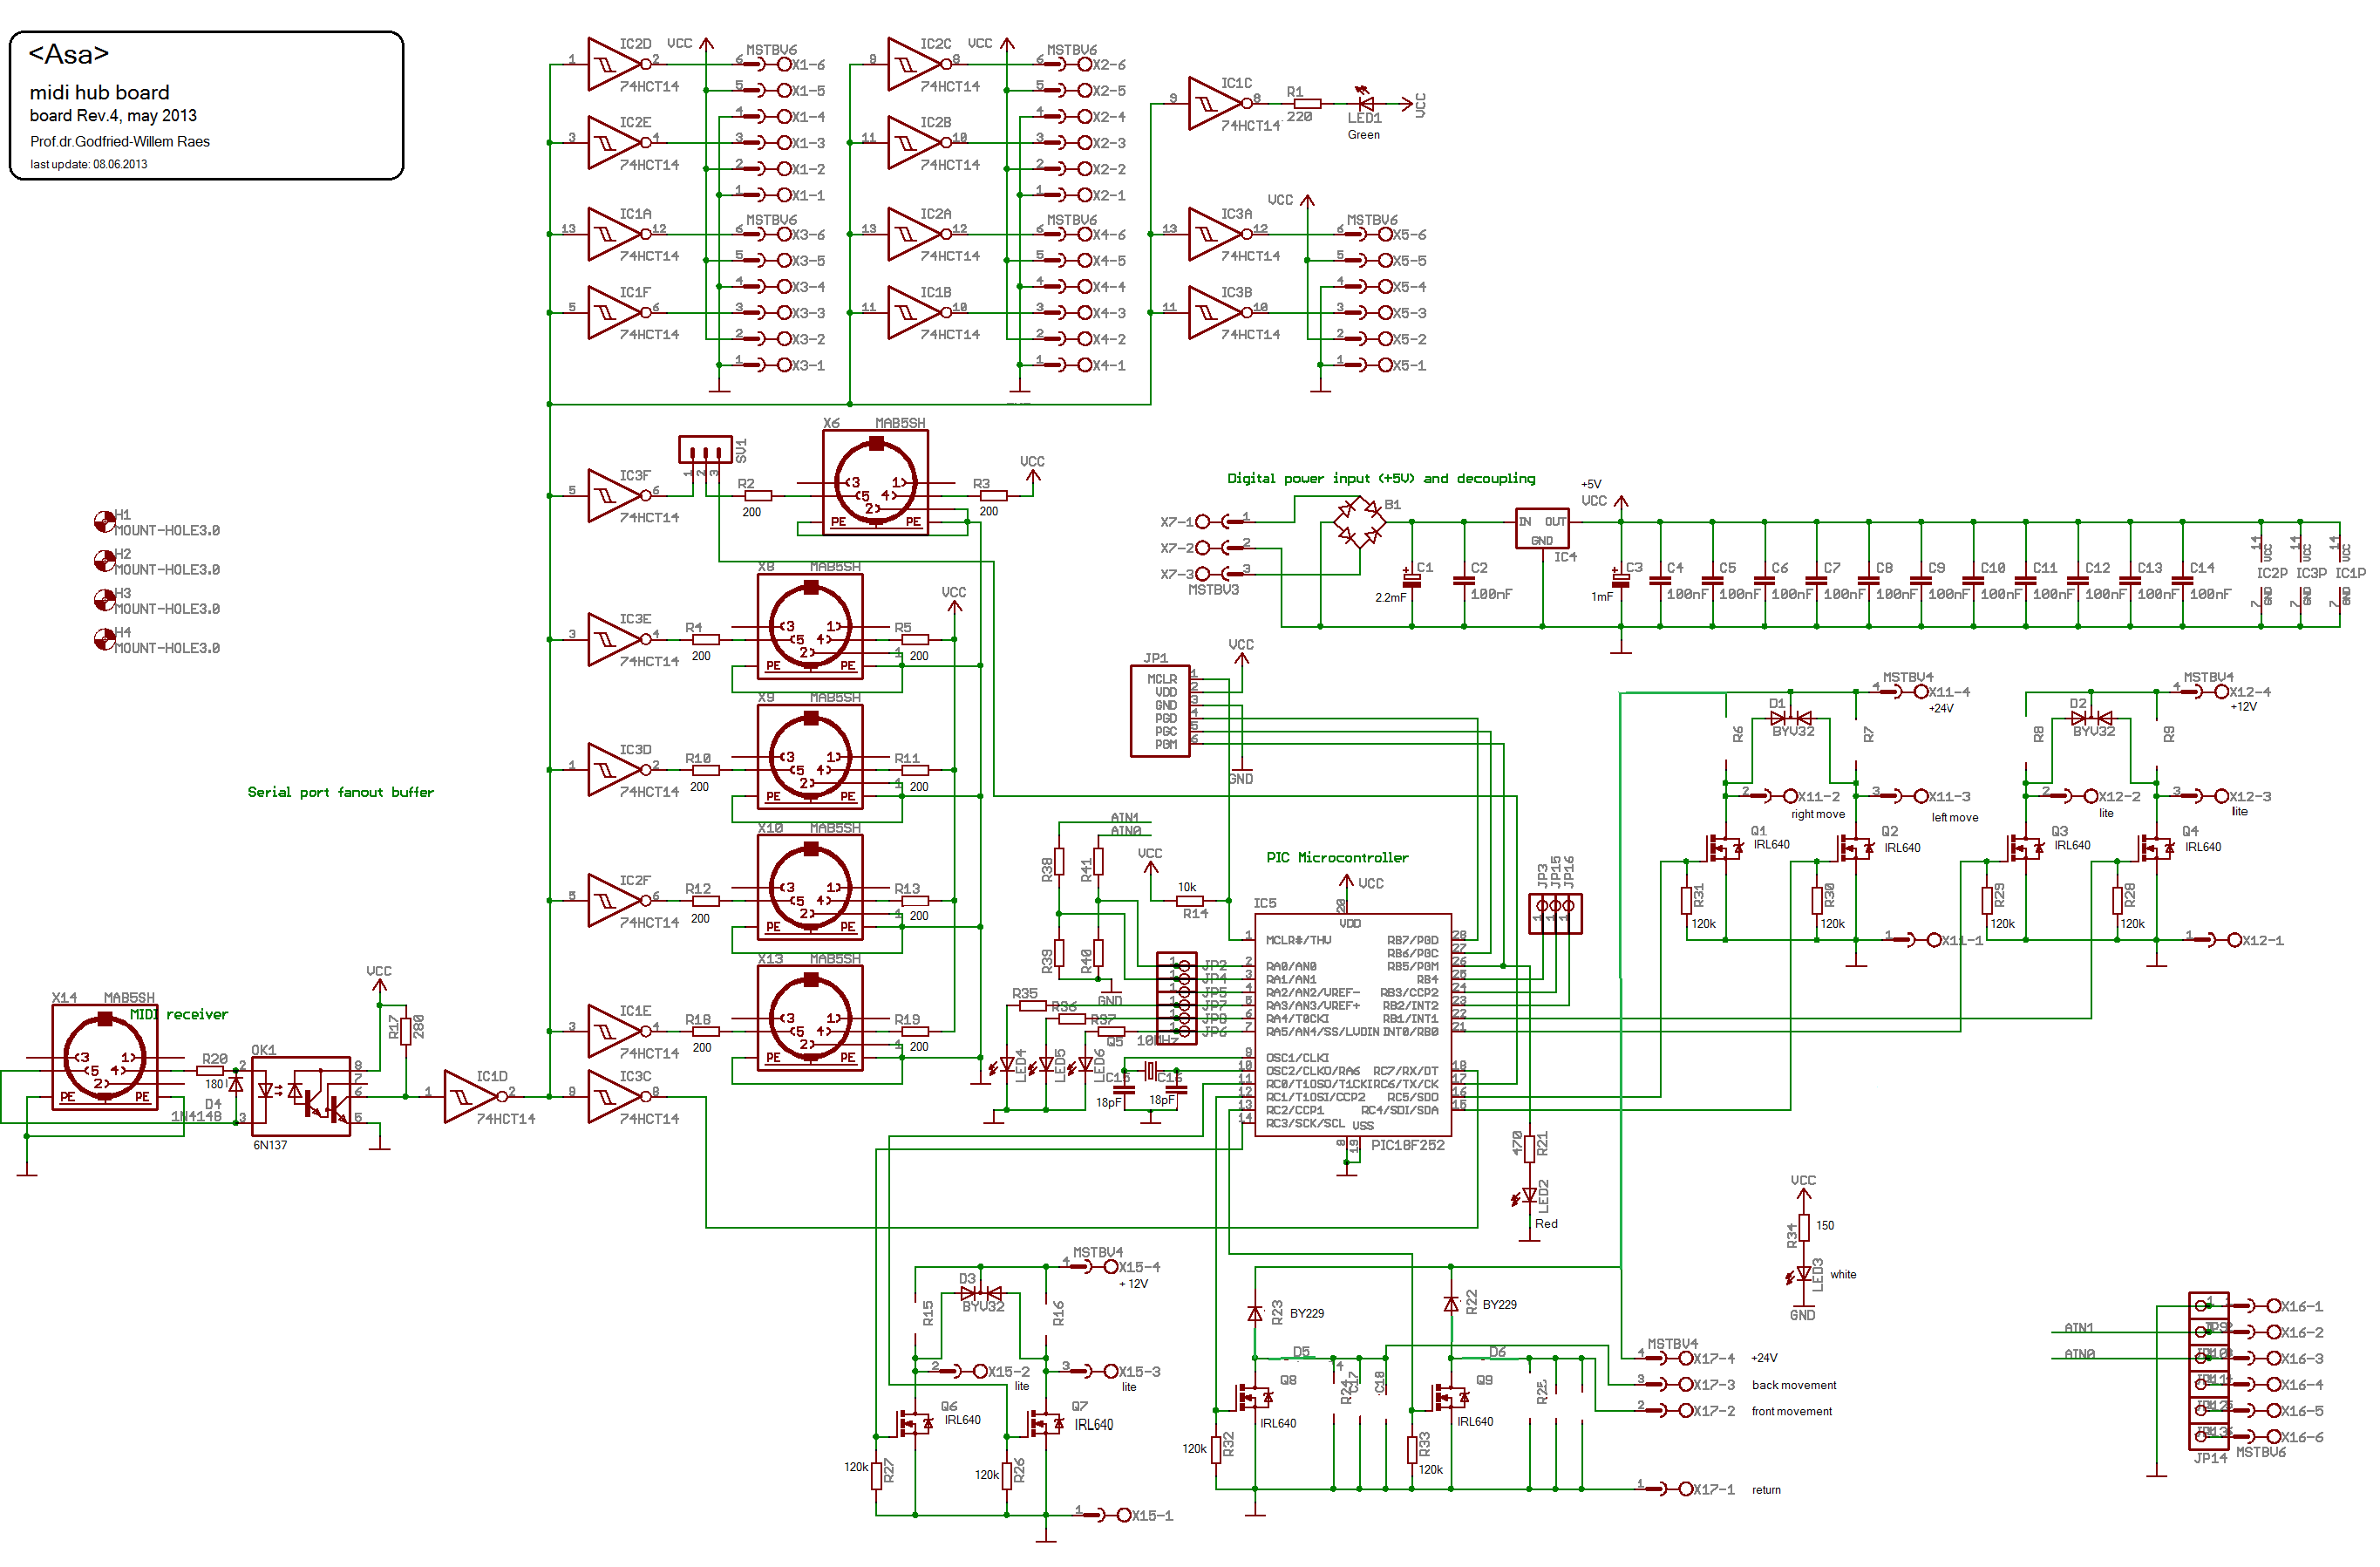
not enough to mount the wheel.Midi hub board
soldered. The resistors R23 and R22 in the circuit diagram substituted with
BY229 diodes in a 2-pin TO220 package. The diodes D5 and D6 substituted by
a wire bridge. The complete circuit diagram
is available here. Start coding for the PIC18F2525 firmware on the midi
hub board, controlling four lights and all motion of the robot. The source
code can be found here.
Position found for both the toroidal transformer and the ILP30 module on the
chassis. It may not be possible to mount a frontwheel with a brake mechanism
though. A difficult task on the menu: lifting the Asa assembly and mounting
it on the wheelbase to weld both together... More than two hours of mounting
work on the welding table to bring everything in place for this final welding.
Operation succeeded. Big difficulties encountoured in an attempt to mount
the first 200 mm wheel... apparently the 3 mm thick 20 mm diameter seamless
tube we used as an axis is not very precise 20mm... Even 50kN of force was
not enough to mount the wheel.Midi hub board
soldered. The resistors R23 and R22 in the circuit diagram substituted with
BY229 diodes in a 2-pin TO220 package. The diodes D5 and D6 substituted by
a wire bridge. The complete circuit diagram
is available here. Start coding for the PIC18F2525 firmware on the midi
hub board, controlling four lights and all motion of the robot. The source
code can be found here. 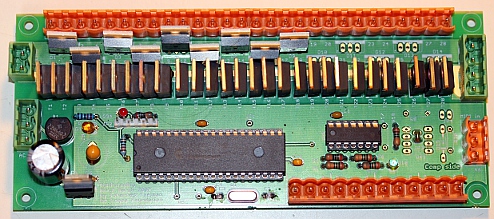 Note
that on this board we do use the power supply and voltage regulator circuitry,
so it has to get 6V ac power on connector X11. The board is wired for operation
with TTL-midi input signals received on connector X6. Double diodes D10, D11,
D12, D13, D14 not mounted yet, as we may need to operate lights from a different
voltage. Electric and functional tests of this board o.k. Start design of
the firmware for the valve-control board, using the same code model as for
<Klar> and <Fa>. Back mounting plate in transparent polycarbonate,
8mm thick, for the valve board finished.
Note
that on this board we do use the power supply and voltage regulator circuitry,
so it has to get 6V ac power on connector X11. The board is wired for operation
with TTL-midi input signals received on connector X6. Double diodes D10, D11,
D12, D13, D14 not mounted yet, as we may need to operate lights from a different
voltage. Electric and functional tests of this board o.k. Start design of
the firmware for the valve-control board, using the same code model as for
<Klar> and <Fa>. Back mounting plate in transparent polycarbonate,
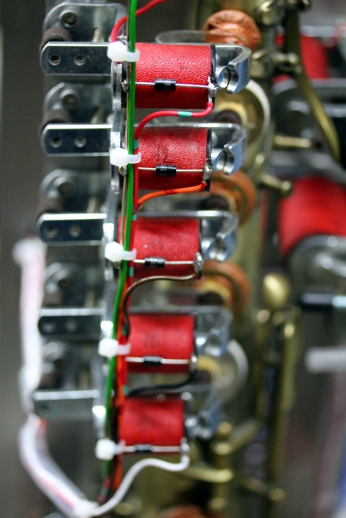
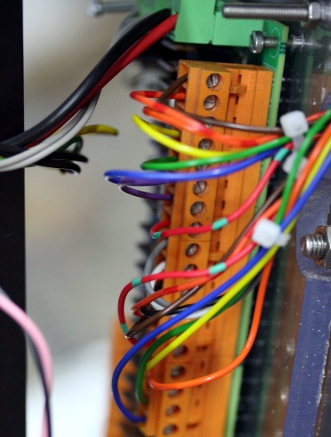
8mm thick, for the valve board finished.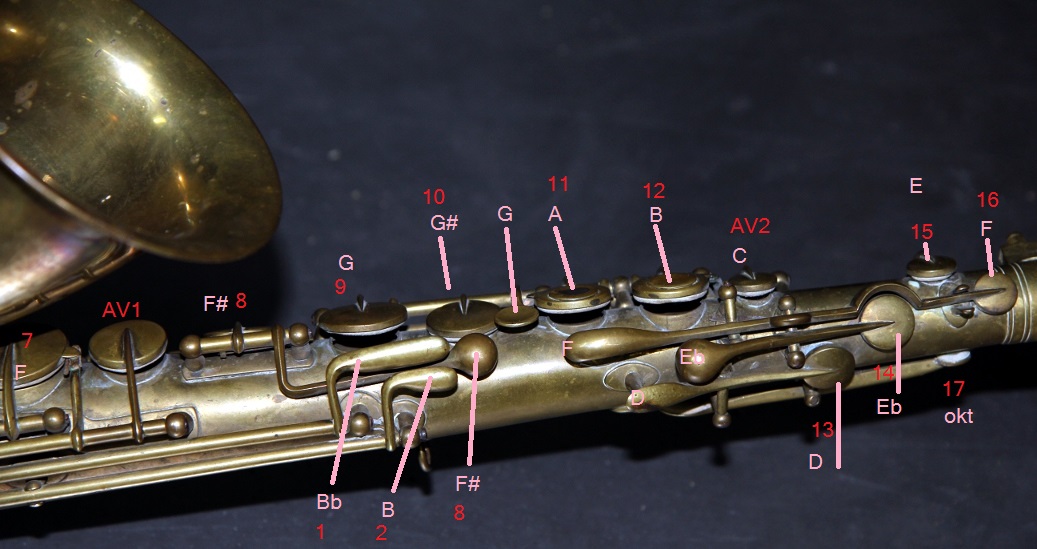 Wire colors
correspond to valve numbers in our numbering scheme, except Av1 and Av2, wherefore
red/green wire color is used. To avoid confusion with the positive supply
lines, valves 2 and 12 are wired using orange/red colored wire.
Wire colors
correspond to valve numbers in our numbering scheme, except Av1 and Av2, wherefore
red/green wire color is used. To avoid confusion with the positive supply
lines, valves 2 and 12 are wired using orange/red colored wire.

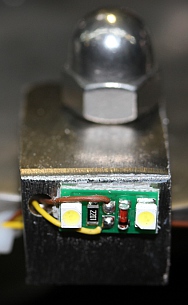
 Since
the LED's work at 30% of their rating, lifetime expectancy even without cooling
should be pretty good.
Since
the LED's work at 30% of their rating, lifetime expectancy even without cooling
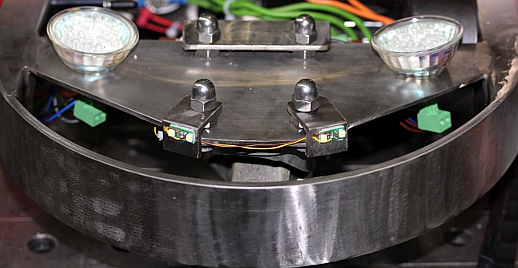
should be pretty good. 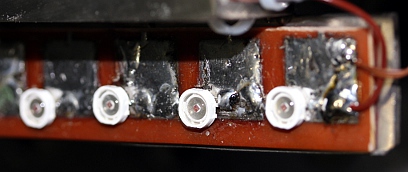 Stainless
steel light holder cut out and welded for these red lights. Blue LED assembly
(Conrad car tuning part) mounted on saxophone carrier as well as a strip of
white LED's (OMC) rated for 12V. Since these strips are not autoadhesive,
we used a thin layer of Parabond High Tack to glue them on the chassis.
Round white LED assembly glued on the backside.
Stainless
steel light holder cut out and welded for these red lights. Blue LED assembly
(Conrad car tuning part) mounted on saxophone carrier as well as a strip of
white LED's (OMC) rated for 12V. Since these strips are not autoadhesive,
we used a thin layer of Parabond High Tack to glue them on the chassis.
Round white LED assembly glued on the backside. 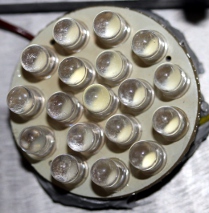 Yellow
LED strip added on the front side.
Yellow
LED strip added on the front side. All light outputs are confined now. Documentation updated accordingly and
implementation in GMT worked out (code module g_MM.inc).
All light outputs are confined now. Documentation updated accordingly and
implementation in GMT worked out (code module g_MM.inc). 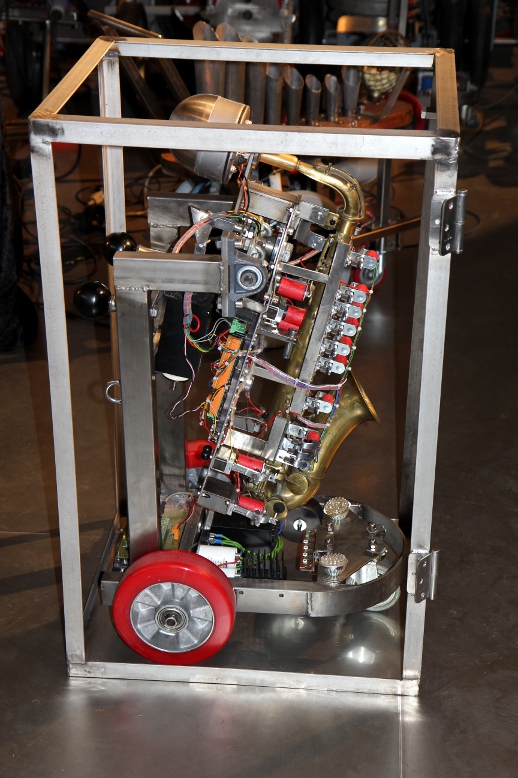

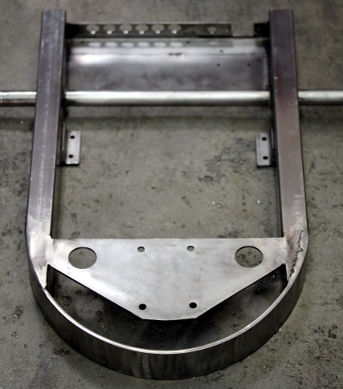
 The bottom plate
is 2mm thick stainless steel and is welded on the profiles.
The bottom plate
is 2mm thick stainless steel and is welded on the profiles.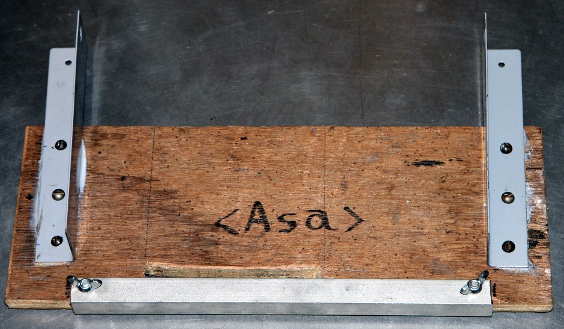 This is how it should be mounted on the <asa> robot prior to transportation:
TO DO:
Robody pictures with <Asa>:
|
| (Back) to Logos Projects page:: | Back to main page:: | Link to Godfried-Willem Raes personal homepage... | Naar katalogus instrumenten | |
Link to composers manual for the complete M&M robot orchestra |
Last update: 2023-10-09 by Godfried-Willem Raes
Technical drawings and data sheets:
Mechanical parts & construction:
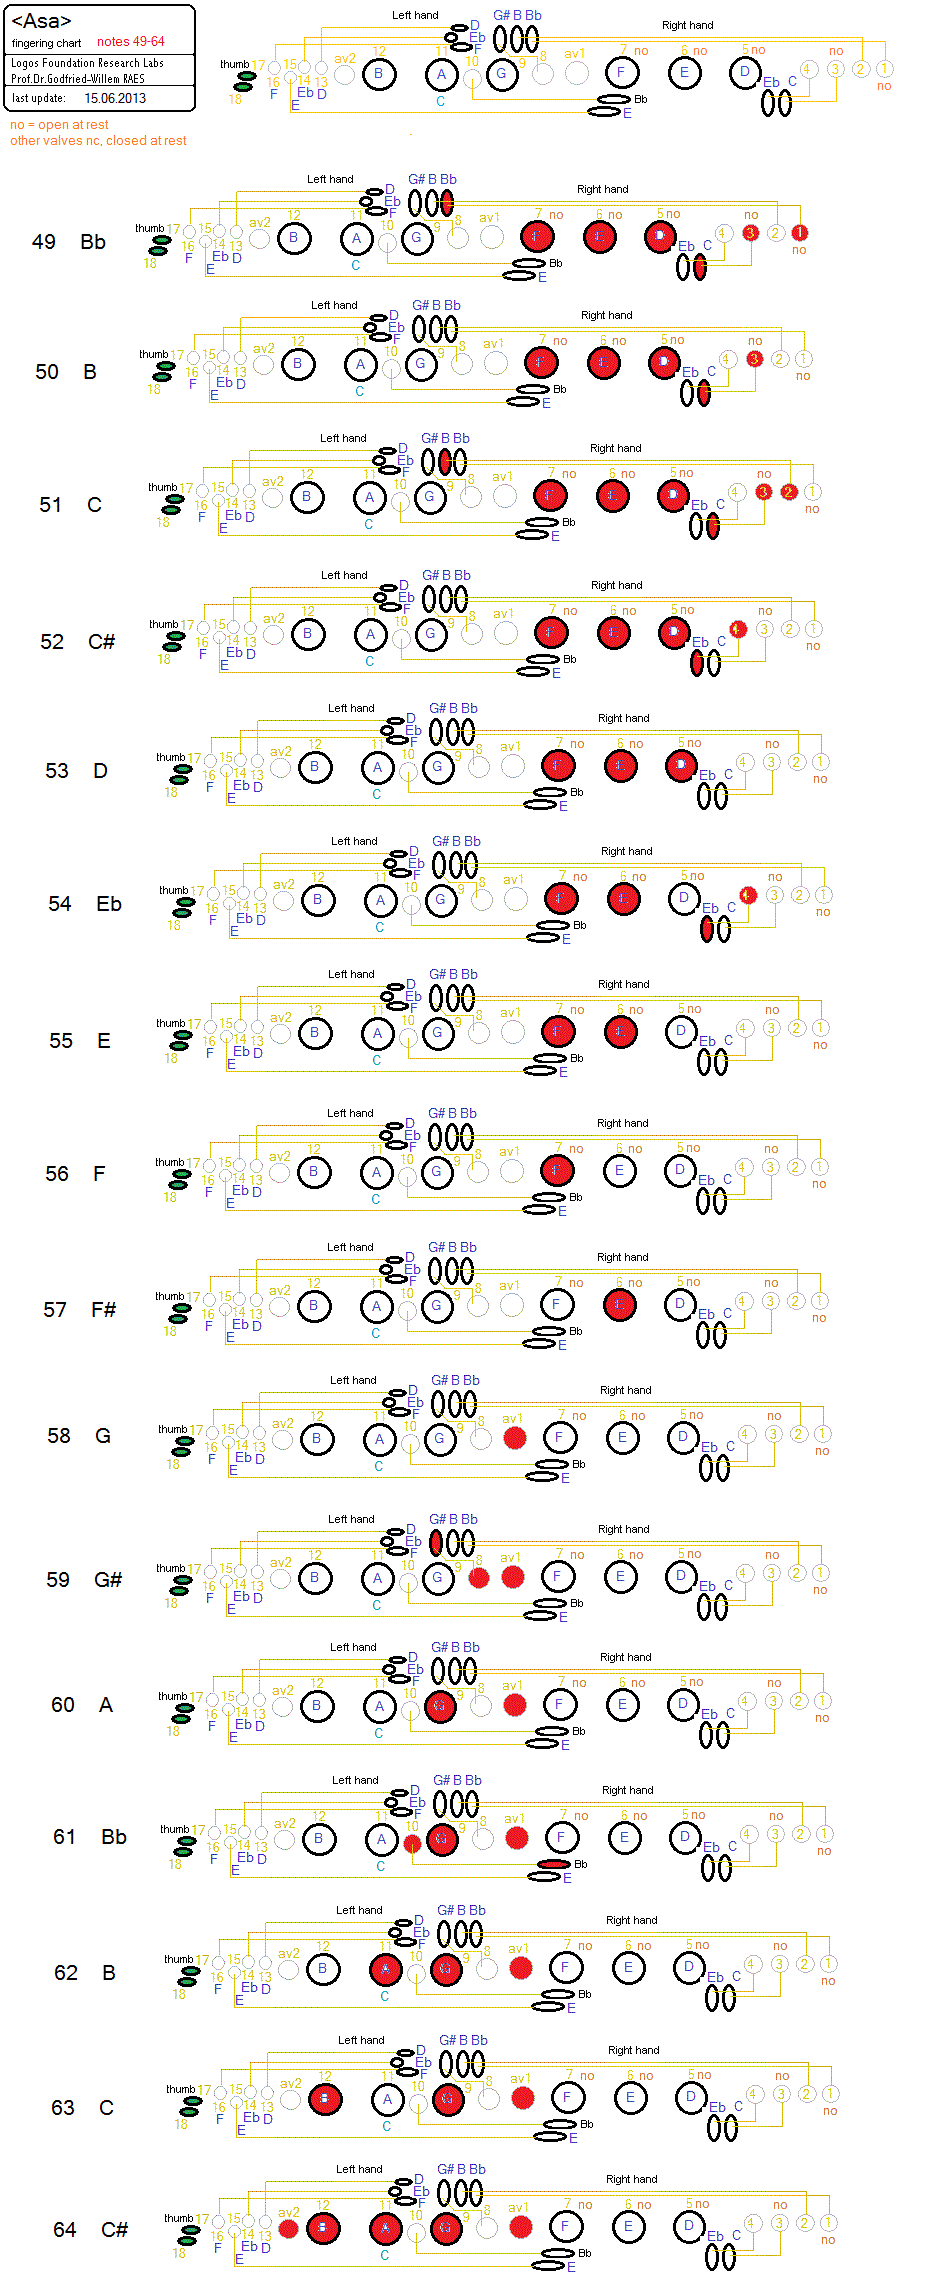
Fingering table for the low octave, notes 49-64 (Bb to C# for saxophonists):
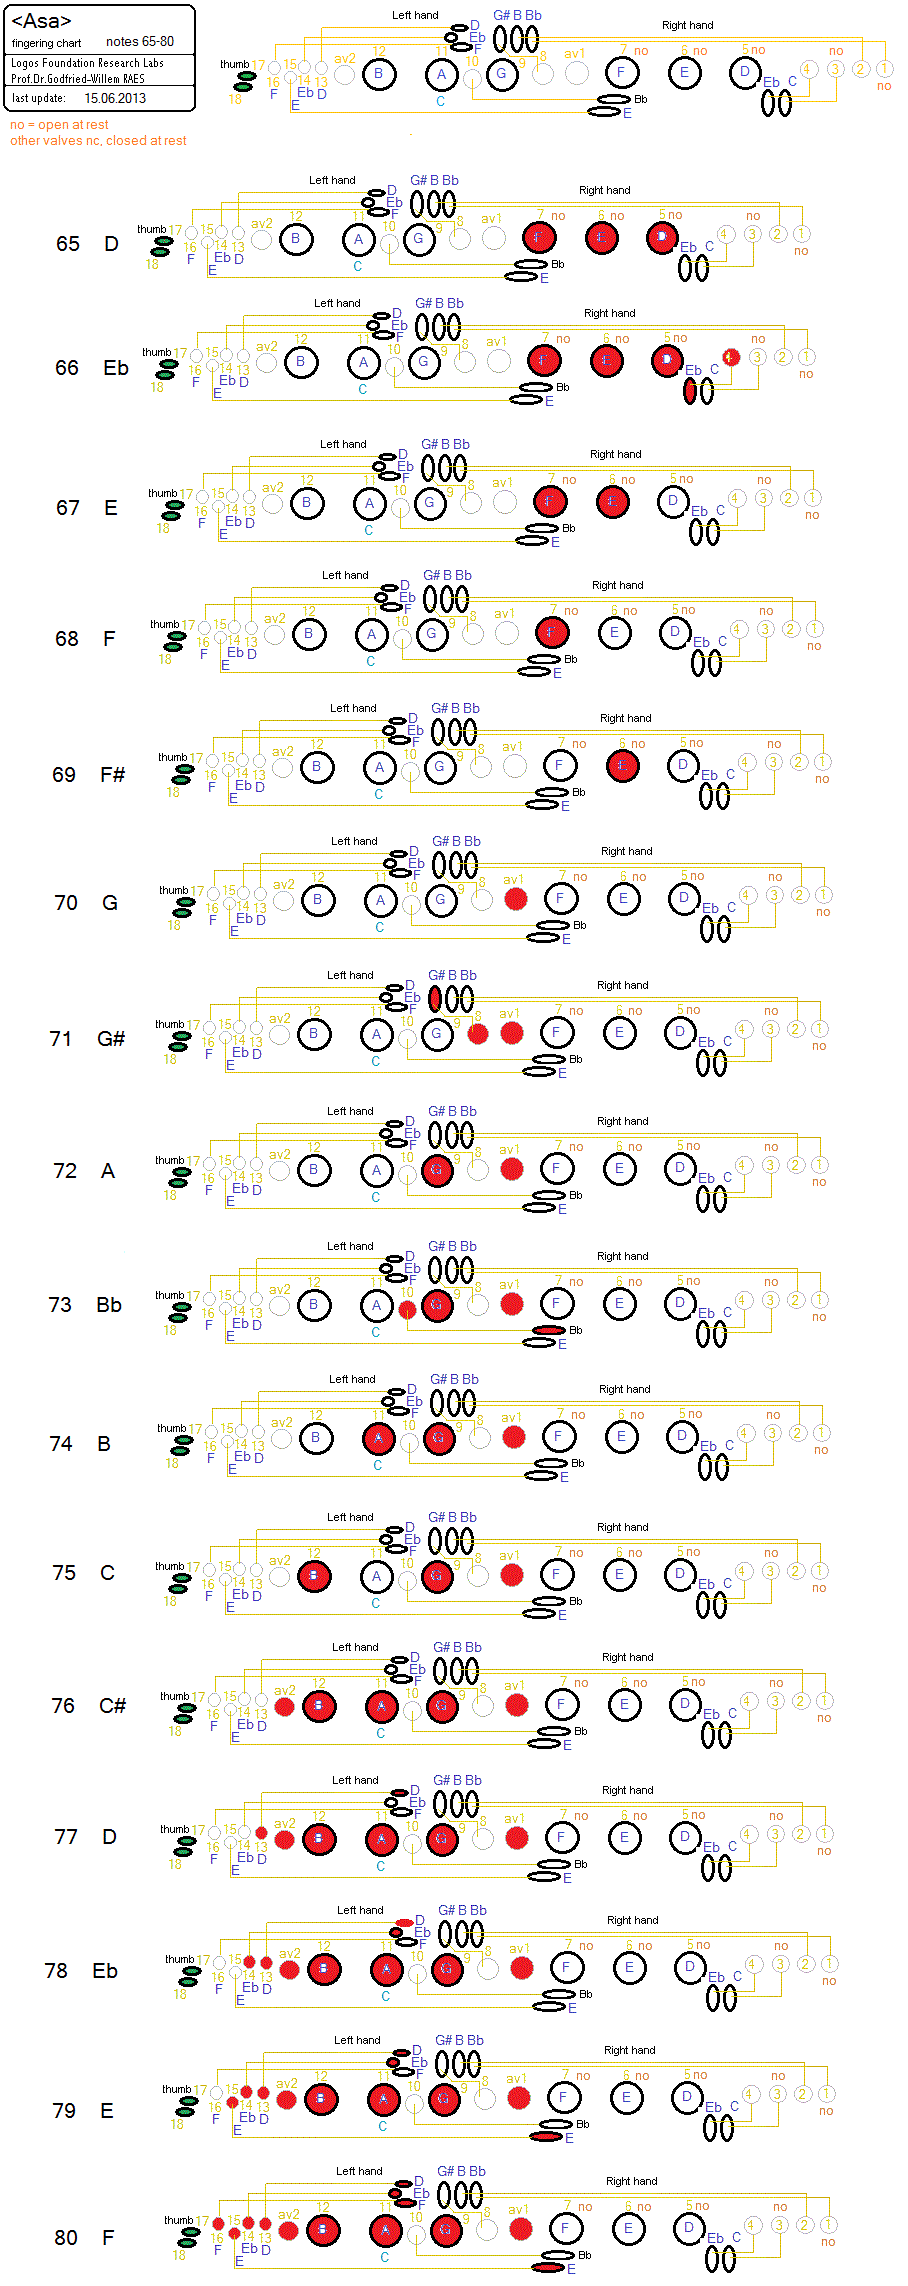
Fingering table for the second octave, notes 65-80 (Bb to C# for saxophonists):
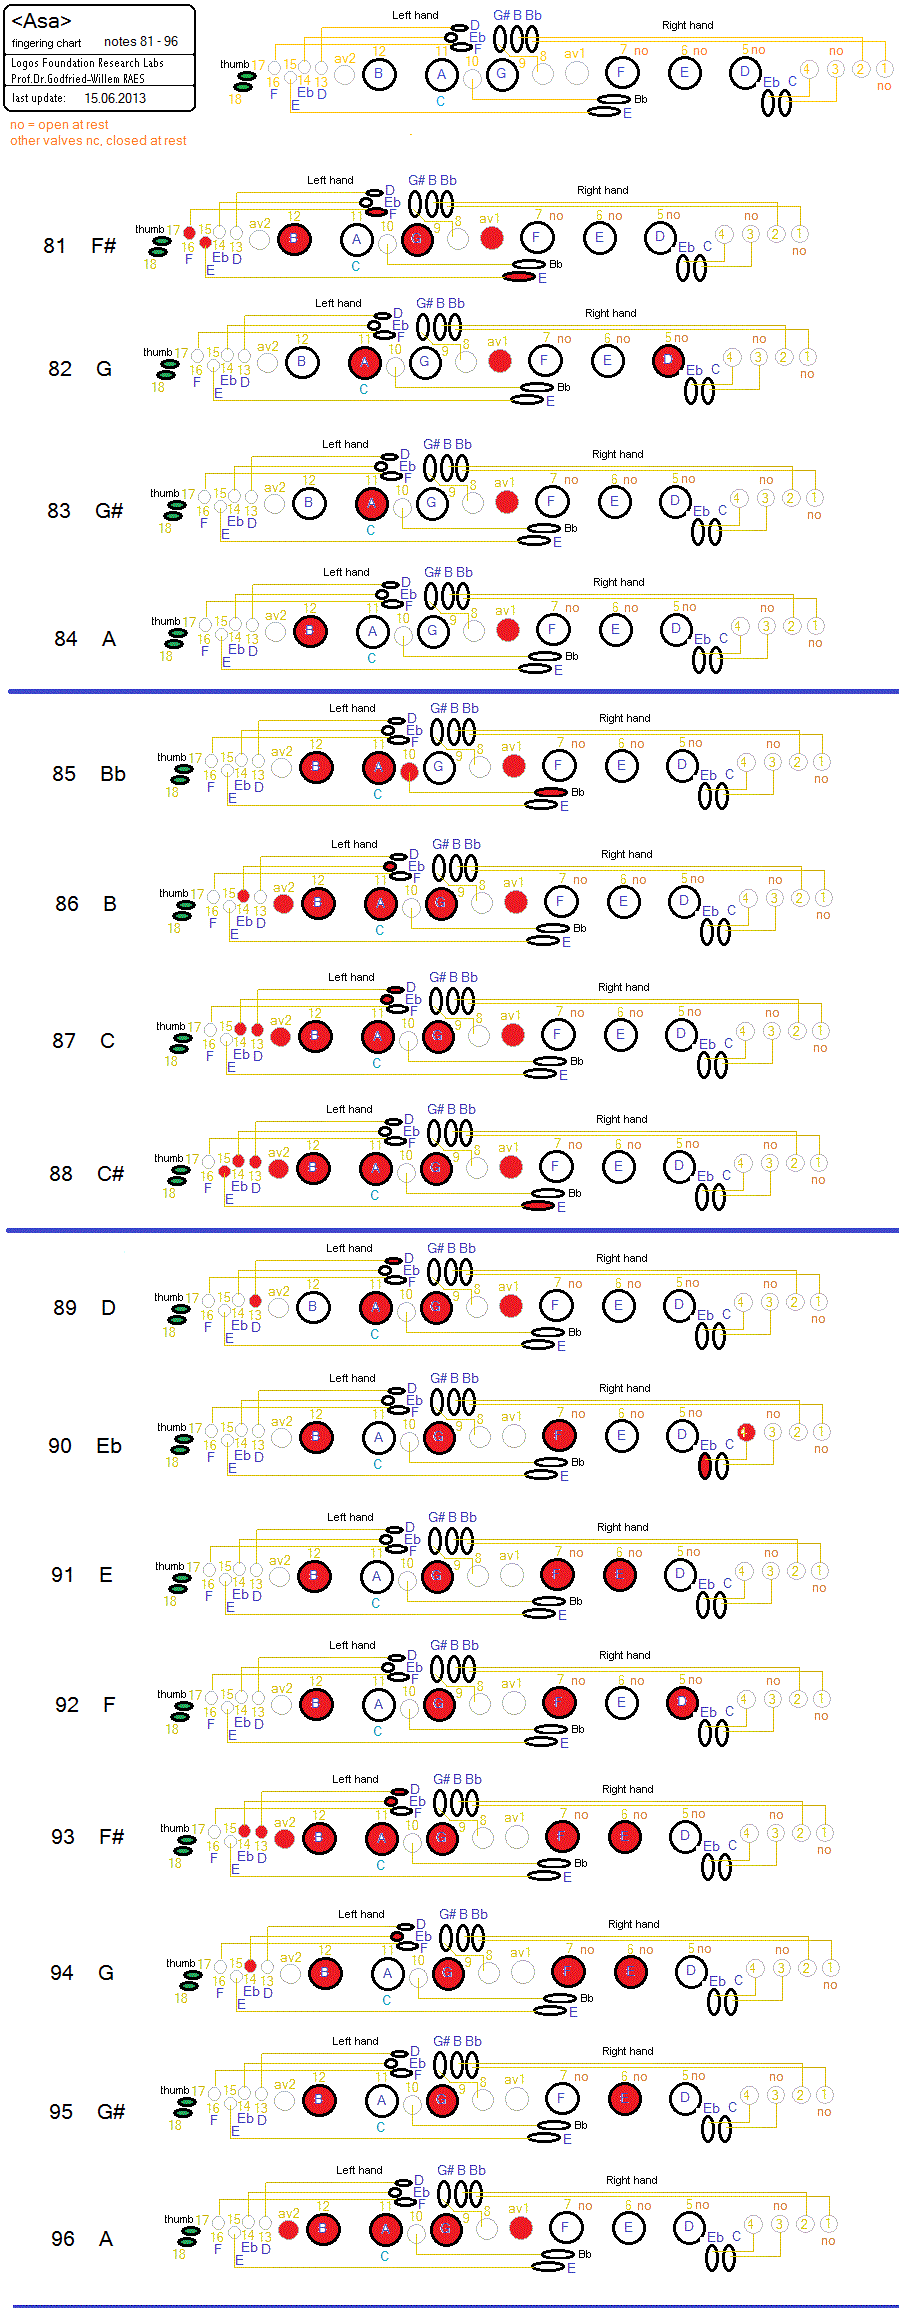
Fingering table for the lower, middle and high altissimo notes 81-96 (F#6 to A7 for saxophonists):
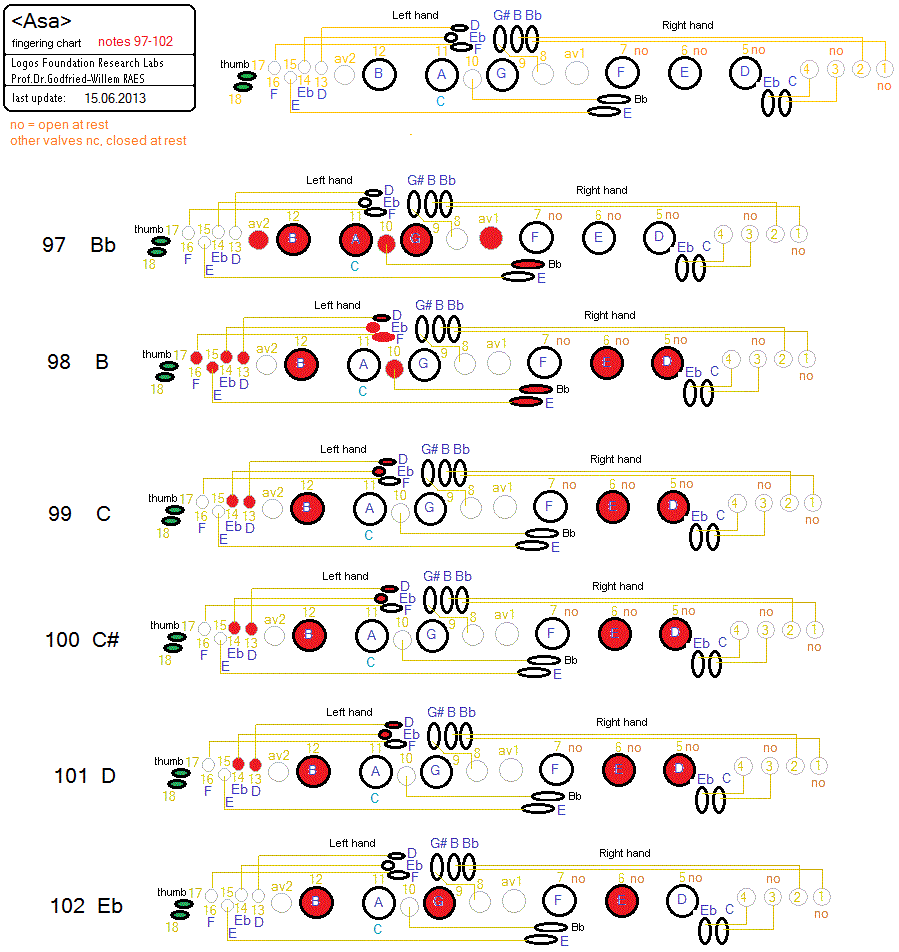
Fingering table for the extreme high notes 97-102 (Bb7 to Eb8 for saxophonists):
Midi-hub board:
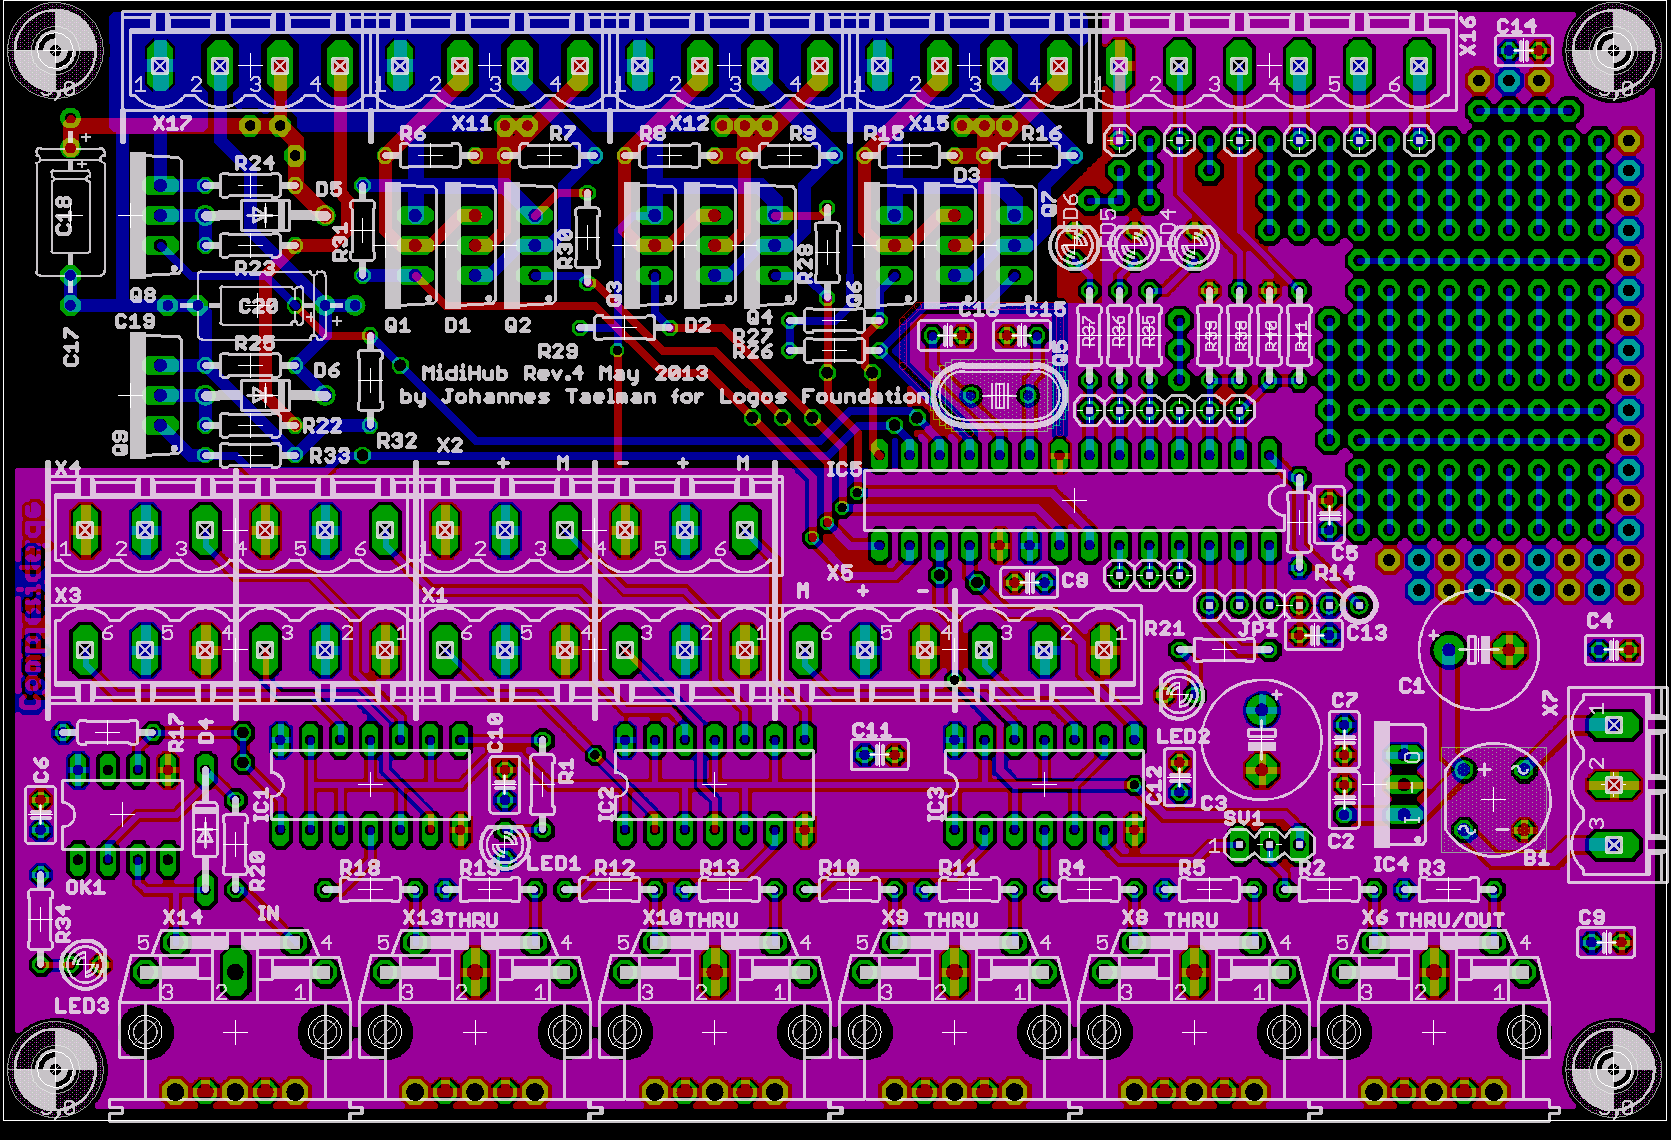
Circuit drawing:
Firmware for this board. (Hex dump)
Valve board:

Firmware for this board:
Driver generator:
ARM discovery board:
Firmware for this board developed by Johannes Taelman as part of the
AXO project.
Power supply:
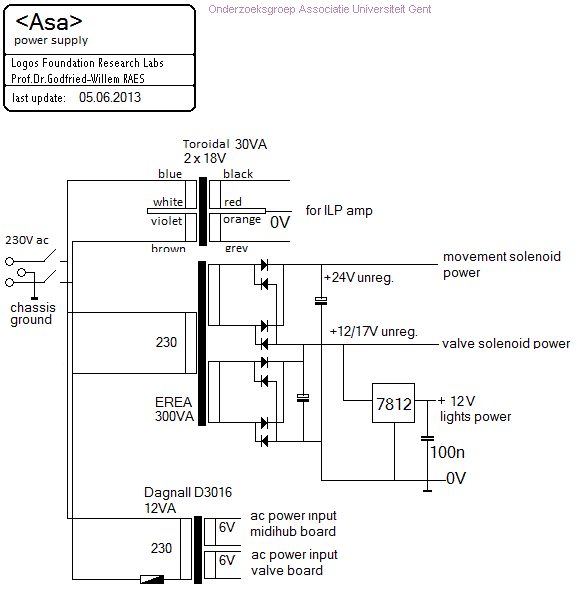
Dagnell transformer ordered from Farnell, order nr.116-6160. Mounting with 4 M3 bolts on the chassis.
Erea transformer: Type E212SC300SK, rated 300VA, two secondary windings, each 11.6V / 12.3A. Primary 230V.
Compression driver unit: Model PADU 100, power rating 100W, impedance 16 Ohms. (Made in China) We have measured this component carefully and found the impedances in function of applied frequency as follows:11.4 Ohms @ 100Hz, 23.68 Ohms @ 1kHz, 26.7 Ohms @ 10kHz and 45 Ohms @ 25kHz. The acoustic load does influence the measured impedance at 1kHz over a 1:2 range: with the mouth completely closed it measures 32.8 Ohms and with the mouth completely opened but without any resonator, 15.35 Ohms. This phenomenon does not occur for the very low neither for the very high frequencies. The measurements were performed with our Hameg LCR meter, model HM8018. The frequency response is 100Hz to 10kHz. The thread for mounting is 1 3/8"-18 TPI.
The impedance convertor designed for this driver was sized after following
sketch:
This part is mounted on the saxophone and on the Padu driver using brown Loctite
gasket silicone.
Wheels:
Solenoid valves: (3 types for the valve operations):
August Laukhuff types as used for organ building:
Tonventilmagnet, August Laukhuff nr. 300900, 12/14V, 30 Ohm, 470mA . Force:
6 - 7.5N. 
Ventilscheibenmagnet, August Laukhuff nr. 300701 (19mm), 300703 (21mm), 300704
(25mm), 300706 (30mm), 300708 (35mm). 12/14V, 75 Ohm, 190mA. 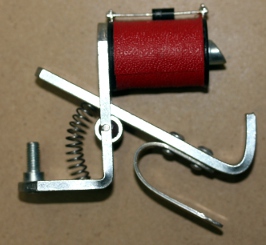
Wippmagnet, August Laukhuff nr. 300600, 12/14V, 75 Ohm, 190mA 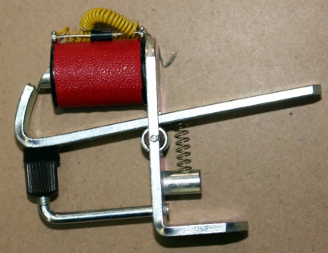
Kleiner Trakturmagnet: August Laukhuff, 24V (used for horizontal movement). DC resistance of the windings:
The forward-backward movement makes use of a single large August Laukhuff bidirectional solenoid operated from 24V. The two windings have a DC resistance of 12 Ohms, hence the current drawn is 2A. Since we never activate both coils with the same power at the same time, a 4A power supply ought to be powerfull enough to feed both solenoids.
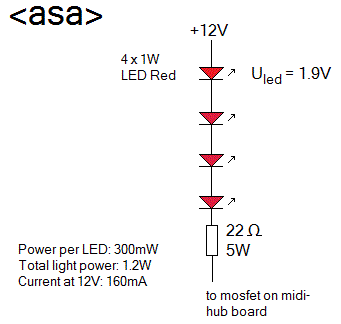
Lights:
two yellow LED spotlights, Paulmann, 12V, 1.7W on the front, oriented upwards. Ordered from Conrad. Mapping on notes 120 and 121.
1 red LED assembly:
Mounting behind the front wheel. Mapping on note 122
2 dual white SMD Led assemblies pointing to the front. Viesmann, type 6018, ordered from Conrad. 12-16V. Mapped on note 123.
1 White LED strip on the instrument assembly. (9 white SMD LED's) OMC part no.1226698. http://www.omc-uk.com. Mapping on note 124
1 Blue LED assembly, 12V. Conrad Electronics. Mapped on note 125
1 Yellow LED strip, 12V on the front, left of the saxophone carrier plate. Mapped on note 126
1 Round white LED assembly, 1W mounted on the backside, 12V. Mapped on note
127
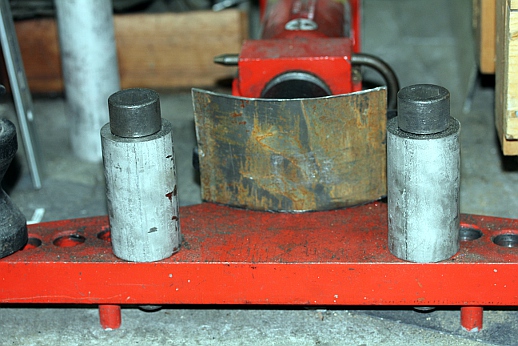
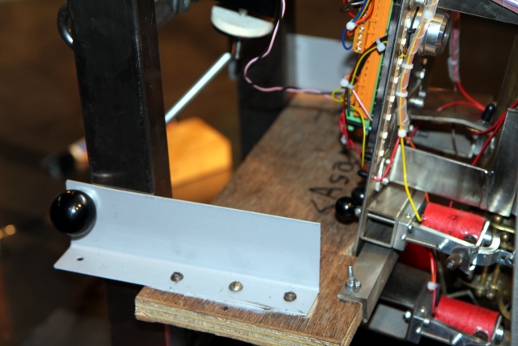
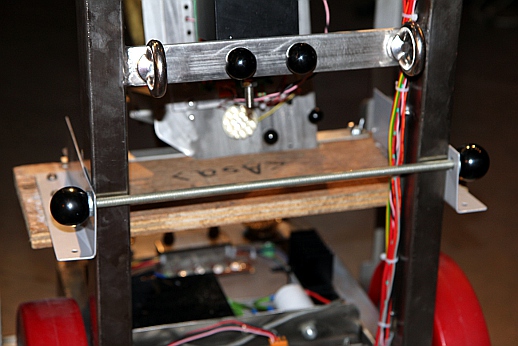
Transportation, packing and mounting instructions for <Asa>
<Asa> has a flightcase specialy designed for its transportation. Prior
to placing the robot in the case, it should be fixed such as to block its movement
completely. A special part is made to do this: First
insert this part carefully between the instrument and the vertical poles. Next
insert the M8 threaded rod through the holes on the back, secure with the two
bakelite spherical knobs with internal M8 thread. Do not forget the thick washers
on both ends. Next bring
the L-profile in place such that the instrument is clamped. Secure the profile
to the wood plate using the two M6 x 40 mm bolts and the wingnuts provided.
No tools required. Once
this has been done, the robot can be driven vertically -in its normal playing
position- in the flightcase. The door of the flightcase should be closed and
locked with two M12 bolts. Do not overtighten these bolts as the thread in the
side panels is only 3 mm thick.
References: